“I’d like to add a table with SharePoint items to the Power Automate approval task details, but it’s a total mess, it doesn’t look as a table at all.”
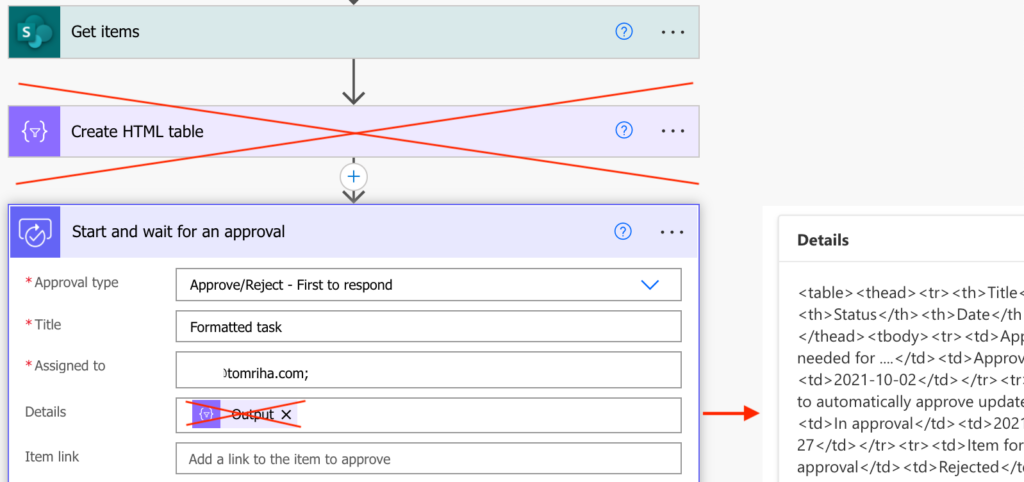
There’s a big difference in Power Automate whether you work with emails or approval tasks. Emails support HTML formatting, approval tasks don’t. They use a different language called markdown instead. If you want to format the task details, you must use that language. Which makes it a bit more complicated to work with as the language doesn’t have any support within the designer. There’s no alternative to the ‘Create HTML table’ action which you could use. If you need a table, you must create it by yourself.
Approval task table format
As described on the page above, tables in markdown language have the format below.
| Heading 1 | Heading 2 | Heading 3 |
|-----------|:-----------:|-----------:|
| Cell A1 | Cell A2 | Cell A3 |
| Cell B1 | Cell B2 | Cell B3 | 
Note: the number of – doesn’t matter, it can be just a single one.
That must be also the format for the SharePoint items you want to include in the task details.
Build the table
One solution could be to initialise a string variable, loop through all the items, and append the rows one by one in the desired format. The other one is to build the table using the ‘Create CSV table’ action and a few expressions.
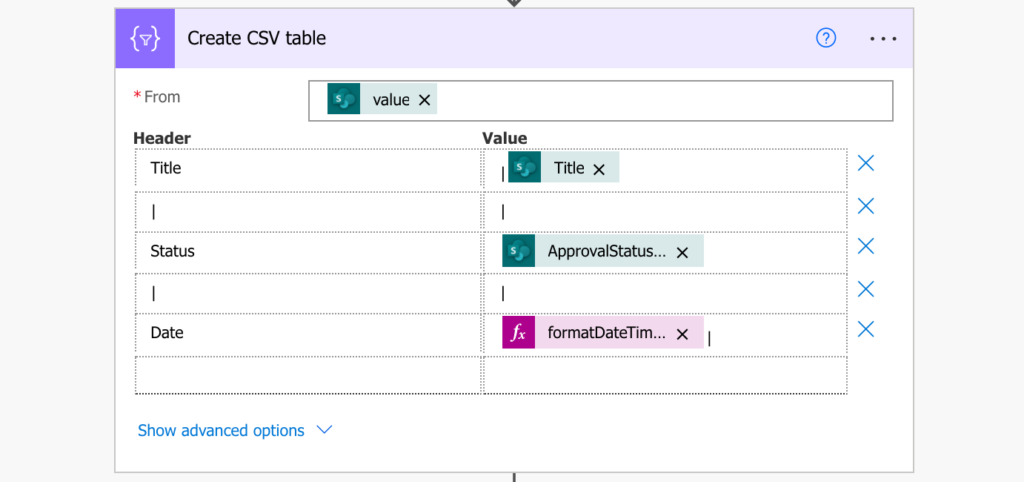
Add the ‘Create CSV table’ action to pick only the relevant columns. Even though you can’t use the ‘Create HTML table’ action, you should still format the values in a readable way. But additionally to the values, you’ll need also a separator. As shown in the example above, all columns must be separated by the | character. Therefore, add one before the first column, one after the last column, and one between each two columns. The one between columns is necessary in case your data contains a comma.
The output will be closer to the desired format, e.g.
Title,|,Status,|,Date
|Approval needed for ....,|,Approved,|,2021-10-02|
|Item to automatically approve update2,|,In approval,|,2021-10-27|
|Item for approval,|,Rejected,|,2021-04-13|
|DateTestItem,|,,|,2021-04-05|
|Direct approval,|,,|,2021-10-13|
You can see it still needs a bit of a cleanup. The header line must be removed, it doesn’t correspond to the required table header. There’s also the set of characters ,|, separating columns that needs to be replaced with a single |.
Firstly, replace the ,|, with a |. This is what the extra | was for. If you tried to replace using only a comma, it could mess up your data (e.g. user name ‘Riha, Tom’). But there’s a high chance that your data doesn’t contain ,|,.
replace(body('Create_CSV_table'),',|,','|')Secondly, remove the header line. You can achieve that by splitting the output by the new line character...
split(replace(body('Create_CSV_table'),',|,','|'),decodeUriComponent('%0A')).. skip(…) the first line from the result …
skip(split(replace(body('Create_CSV_table'),',|,','|'),decodeUriComponent('%0A')),1)… and put it all back together with join(…) using the same new line character.
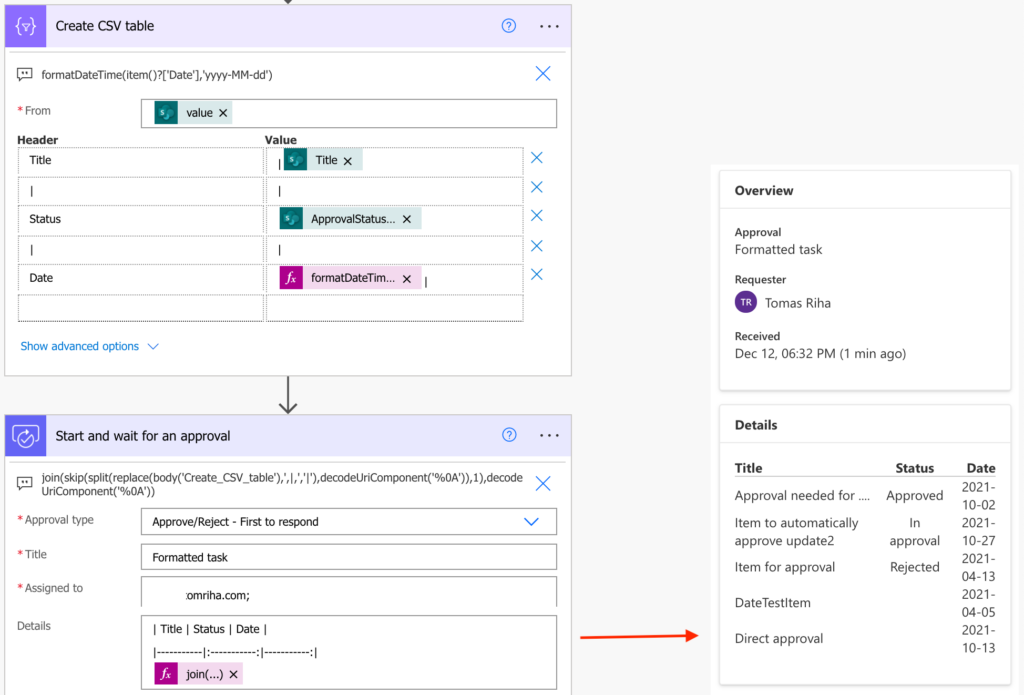
join(skip(split(replace(body('Create_CSV_table'),',|,','|'),decodeUriComponent('%0A')),1),decodeUriComponent('%0A'))The result will be the body of the table, without the header and the header separator. Add the markdown heading to the approval action…
| Title | Status | Date |
|-----------|:-----------:|-----------:|
… and add the expression as the table content.
Summary
The process to add a table to the Power Automate approval task details is completely different than if you add it to an email. But it shouldn’t surprise you as the email and approval task attachments have a different format, and links in description too.
Since there’s no standard action to use, you’ve got two options. One is to loop through all the items (which was not part of this post). The other is to use the ‘Create CSV table’ action and a few expression to format all the rows at once.
i want above table to be transpose how to do that?
Hello Sunny,
no idea, I never needed to do that.