“I am building a Power Automate flow and need to append values into a string variable, how can I add a new line/line feed into the variable”
When you build a string in Power Automate, sometimes you don’t want one long string. Having everything on a single line might be easier to work with, but terrible to read. And if user readability is important for your solution, you might need to add a few line breaks. In a reverse to replacing new lines, let’s take a look on adding new lines to a string.
Add new line in an action
The simplest solution is to add the new line directly in the editor. Enter all the dynamic content you want to turn into a string, including the format, into an action. You can use spaces, new lines, special characters… design the whole string visually.

Note: if you’re appending the string to a variable, don’t forget to add one extra new line at the end. The next string will start on the new line.
Add new line to concat(…) expression
Another approach to building a string is using an expression. Instead of a separate action to build it visually, you can use the concat(…) expression. It’ll take all the values separated by a comma and turn them into a string.
concat('string1','string2','string3')
->
string1string2string3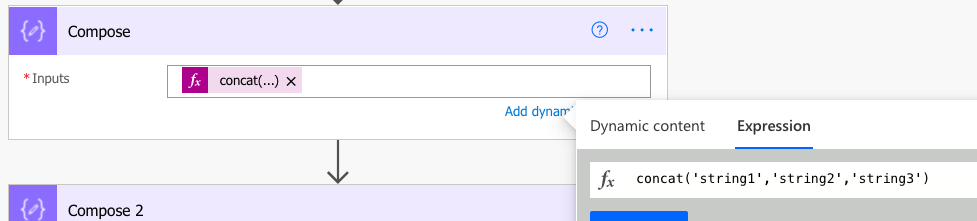
To add a new line into the string you must add the ‘new line’ character as one of the values. There’re three options how to do that.
Add ‘Enter’ into the expression
The first one is to add ‘Enter’ into the expression. Add opening single quote, press Enter on your keyboard, and then add the closing single quote. It’ll split the expression on multiple lines, but Power Automate will translate it as a new line character.
concat('string1','
','string2','
','string3')
->
string1
string2
string3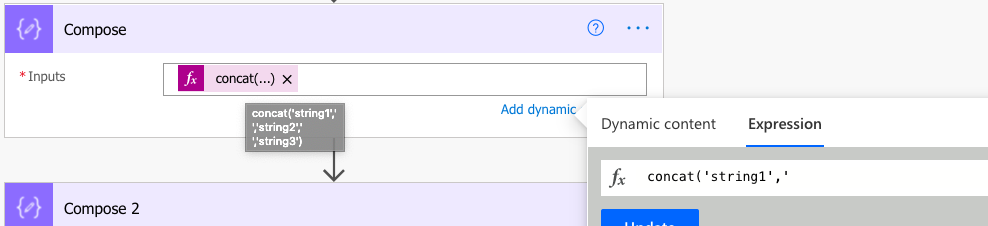
Create ‘new line’ variable and use it in the expression
The second approach is to create a new variable with the ‘new line’ character. Initialize a new string variable, and in the ‘Value’ field press Enter. Such variable can then be used in the concat(…) expression as a new line.
concat('string1',variables('var_newLine'),'string2',variables('var_newLine'),'string3')
->
string1
string2
string3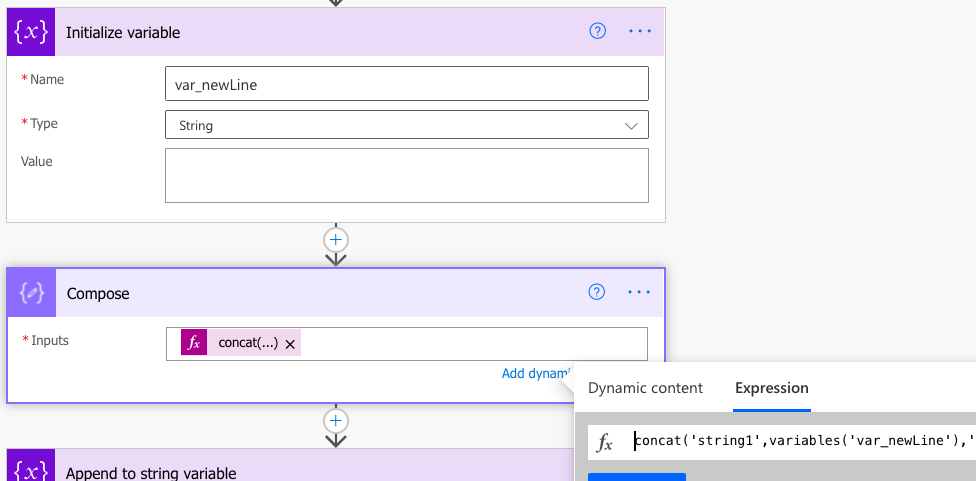
Use decodeUriComponent(‘%0A’) expression
The third, and my preferred approach is to use the decodeUriComponent(‘%0A’) expression. As already explained in the article on replacing new lines in a string, the expression will give you the ‘new line’ character. With this expression you don’t need a special variable nor depend on the expression “layout”.
concat('string1',decodeUriComponent('%0A'),'string2',decodeUriComponent('%0A'),'string3')
->
string1
string2
string3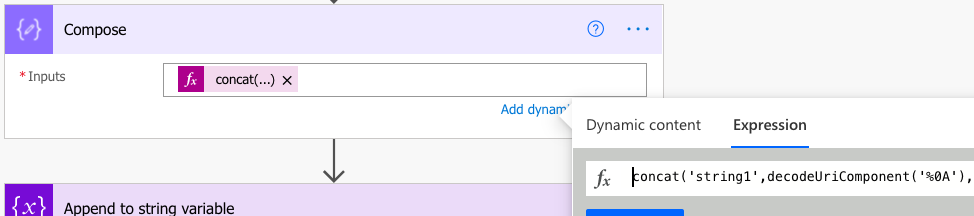
Summary
As you can see, it can be simple or not so simple to add a new line to a string in Power Automate. If you can format the string directly in an action, do it. It’s easy to design, easy to work with, and it can be done by everyone without the expressions knowledge. It’s an approach I use when building simple approval history on document libraries in plain text instead of html table.
The expression approach can get a bit confusing if you’re building strings from multiple pieces. As you can’t format the string visually, it’s quite easy to get lost in all the pieces of the expression. I’d recommend using it only if you can’t format the string in an action, e.g. when exporting data to .csv or creating an html table.
And as already mentioned in a note, if you’re appending to a string, don’t forget to add a new line at the end of each string.
Thanks! Used decodeUriComponent easily and successfully to format the Notes field in a Planner task with output from a Forms survey.
Thank you SO MUCH! I have been trying to figure this out for a little while and have not found a solution that works until I found this blog post. Cheers!
Much useful. Thank you.
Great! thks!
Great THX
Hello!
I have a string variable in a for each where I concatenate several strings and I want to finish with a new line for the following iteration to store the values in a new line because I need to show those values into an e-mail that I´m sending, but I´ve tried all the ways explained, and none worked for me 🙁 It’s still printing the values without line break, any ideas? I would be very gratefull if you could help me 🙂
Thanks in advance,
Regards
Hello Ana,
emails use HTML formatting so I’d try adding the
tag at the end of the line instead of this solution.
Thanks a lot, saved me so much time.
Thanks! decodeUriComponent worked like a charm.
I use
concat(items(‘For_each’)?[‘Title’],”)
and it works fine
Thanks for this guide. I hate all these tiny little papercuts in Power Automate. Why can’t it just use the completely standard “\n”, or failing that, just a “newline()” function? There’s so many similar things where, in order to do something simple in Power Automate, you have to go in this very roundabout hacky way.
Power Automate is so useful but there’s so many dumb little rough edges.
decodeUriComponent(‘%0A’) function not resulting as new line, I have tried multiple times but getting same result.
Used Coding as below:
concat(‘Dear ‘, outputs(‘Get_response_details’)?[‘body/r22c8457f49aa434bb05d7bf4c2388207’], ‘,’, decodeUriComponent(‘%0D’), ‘We have received a request from your team member’, outputs(‘Get_response_details’)?[‘body/reba4738b5a7f440f80d37a90ec49723d’], ‘ details as below for your approval:’, ‘EMP ID:’, outputs(‘Get_response_details’)?[‘body/red9ae38e9ee248229cc236ec690e6151’], ‘EMP Name’)
Your coding uses decodeUriComponent(‘%0D’) not decodeUriComponent(‘%0A’).