“Is there a way to display approval history in some way that’s easy to read for the users when using Power Automate? Maybe directly in the SP list?”
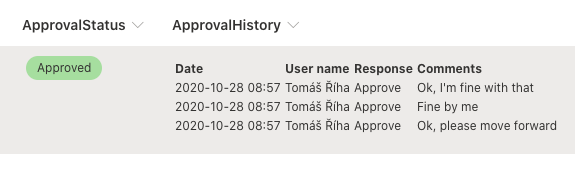
Using Power Automate, the whole approval history for everything is in one place. Power Automate -> Action items -> Approvals -> History. But I don’t think it’s really user friendly if you need a quick overview, or if you need to share it with other users. It’s much better to keep the approval history directly in the item/document itself, and that’s the goal of this post.
Prerequisite: ‘Multiple lines of text’ column with ‘Enhanced rich text’ enabled to store the history.
Building ‘Approval history’ table
We’ll need a variable dedicated to building the Approval history table, let’s call it ‘ApprovalHistoryTable’. The Approval history table is using HTML elements (that’s why the column has to be enhanced rich text), so during the initialization we can already put the first HTML elements in it. The code below will start the table and add the headers Date, User name, Response and Comments to it.
<table><tr><th>Date</th><th>User name</th><th>Response</th><th>Comments</th></tr>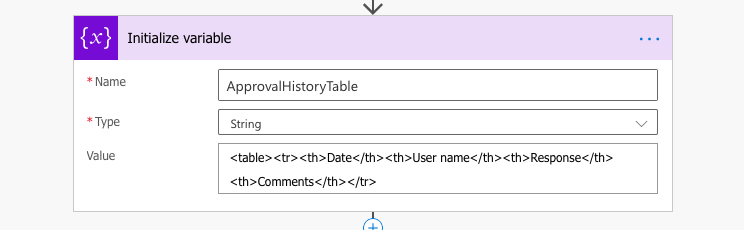
We can also initialize one more string variable that will be needed later. Let’s call it ‘DateToFormat’ and we’ll use it to format the date in a user readable way.

With this we’re ready to skip a bit in the flow, right after the ‘Approval’ action.
Add ‘Approval history’ line for each step
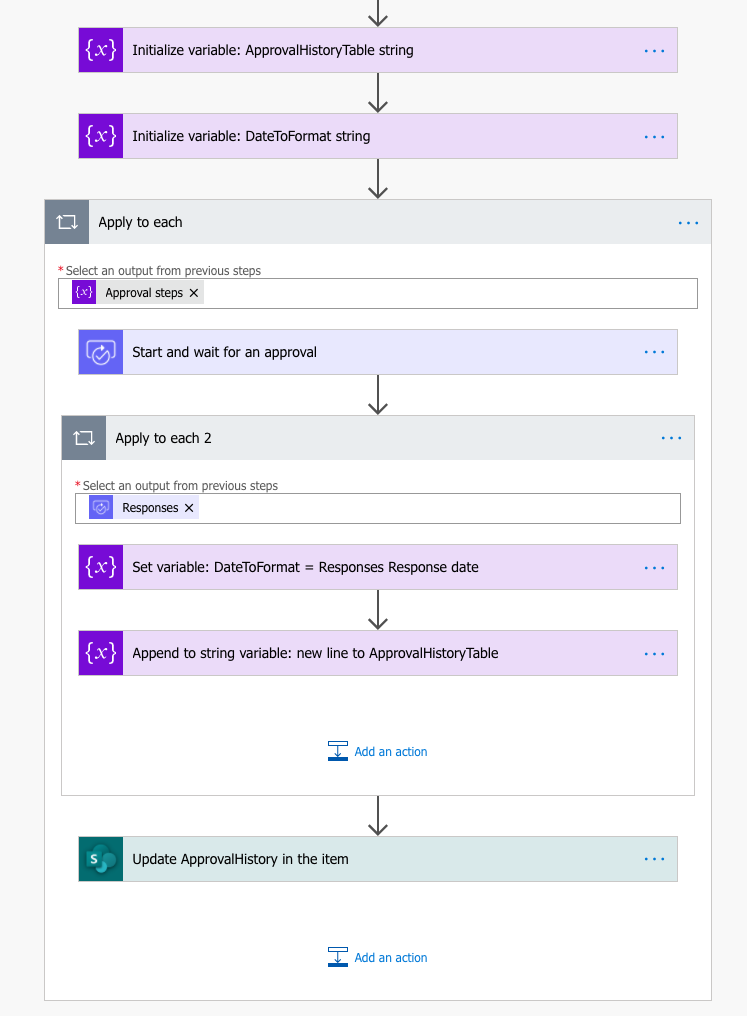
The ‘Apply to each’ action where you’re processing all the approval ‘Responses’ is our next target.
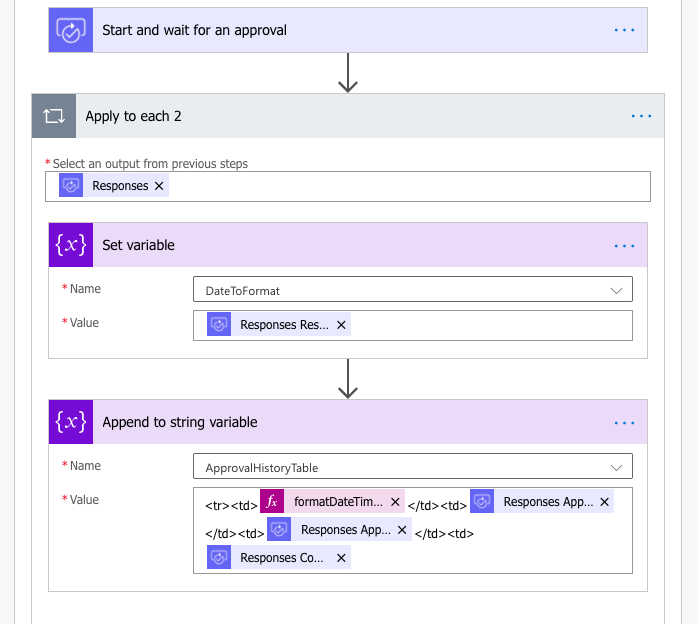
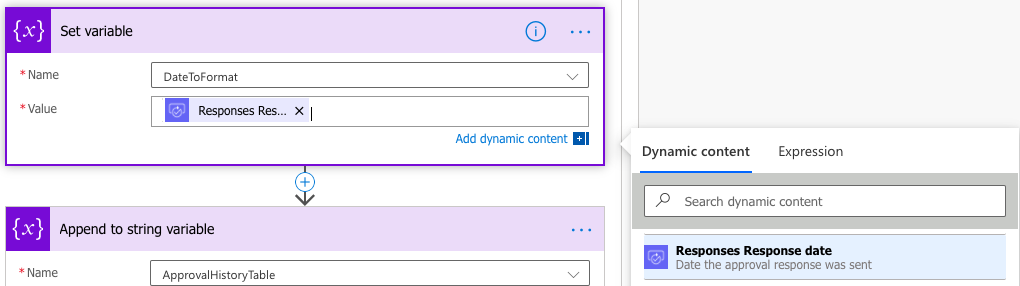
This is the moment when we’ve got all the information we need for the table. The first step is to store the response date into the ‘DateToFormat’ variable. It is necessary as we can’t apply the formatDateTime() expression on the response date, but we can apply it on a variable.
The second step is to add another line in HTML format to our ‘ApprovalHistoryTable’ using the ‘Append to string variable’ action.
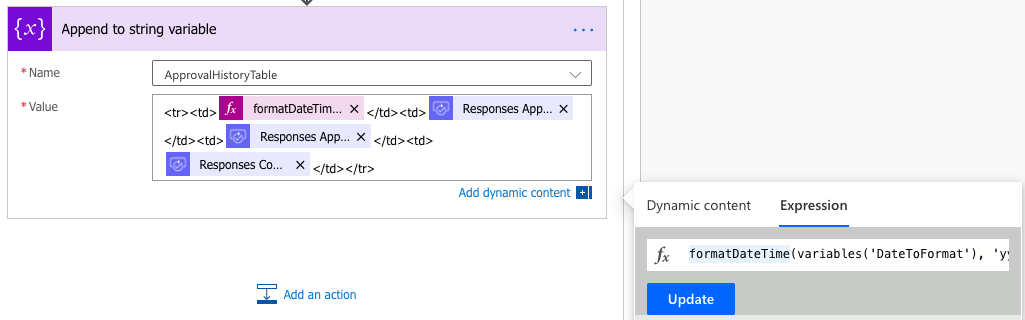
<tr><td>[formatDateTime(variables('DateToFormat'), 'yyyy-MM-dd HH:mm')]</td><td>[Responses Approver name]</td><td>[Responses Approver response]</td><td>[Responses Comments]</td></tr>Notes:
[formatDateTime(variables(‘DateToFormat’), ‘yyyy-MM-dd HH:mm’)] is an expression using the ‘DateToFormat’ variable, you can format the date/time as you wish. You can find more formatting options in my previous post.
[Responses …] are all dynamic content from the ‘Start and wait for an approval’ action.
[] are used only for graphic representation of the expression and dynamic content, they’re not part of the code.
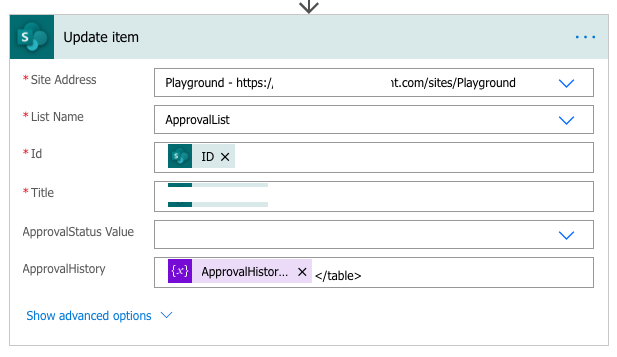
Update the ‘Approval history’ into the item
Once we have the new lines in ‘ApprovalHistoryTable’ variable, we can update it in the item. You can use either the ‘Update item’ action, or HTTP request to update that single column. Just don’t forget to add </table> at the end to close the table.
The order of the actions that create the approval history table is below.
Summary
I consider the ‘Approval history’ solution described above as a baseline for any approval process. I don’t expect users want to go to the Power Automate application to see approval history. They want to have clear overview right away. And that’s exactly the reason to use this solution. It doesn’t add much complexity to the approval flow, but the benefits I see are huge.
Just keep in mind that the solution above doesn’t describe Approval process implementation, it is only an extension to an Approval process. And be careful about infinite trigger loop with ‘on update’ triggers.
I have a question about the creation of a sharepoint list based specifically on the approval flow triggered by one of the 5 users in my group that send out documents for approvals. We have 20-30 approvers, and their comments that need to be visible to upper management and for compliance reasons.
Any help would be greatly appreciated! I’m trying to avoid the switch to opentext as we’ve finally got our sharepoint doc library with all it’s metadata organized beautifully!
Hello Tina,
if you don’t want to keep the history directly in a separate column in the library, you can use the solution described here: https://tomriha.com/how-to-log-approval-history-in-a-sharepoint-list-with-power-automate/
Hi Tom,
This is working great for me thanks. I’m thinking that it would be good to have the email addresses of the group of people that need to be assigned to the ‘Start and wait for an approval’ rather than have to add each user (I have a number of approval conditions and each conditions has a different list of people).
I’ve created my excel file with a table containing a single column of email addresses. I’ve added an action ‘List rows present in table’. in the ‘Start and wait for an approval’, when I add the table name it gets put in an ‘Apply to each’ action.
Will this mess up my history table?
Thanks
Craig
Hello Craig,
the ‘Apply to each’ is added automatically because the ‘List rows…’ action can return multiple rows (https://tomriha.com/stop-power-automate-flow-from-adding-apply-to-each-automatically/). If that’s what it should do – create a task for each row or it always returns just a single row then it’s fine. It’ll not mess up the history table if you always take the latest value and append the new response (don’t replace it).
Some time ago I even wrote articles about a similar solution using SharePoint list for the configuration as I don’t like using Excel files: https://tomriha.com/build-approval-flow-for-various-number-of-approvers-in-power-automate/ and https://tomriha.com/use-configuration-lists-to-avoid-repeating-actions-in-power-automate/.
Hi Tom,
Apologies for not responding earlier. I have this work great now, thanks. I’ve also moved the flow forward so that the SP list gets populated as ‘Waiting’ whilst the approval cycle happens (I had someone who took 3wks to approve).
I do have another question, is it possible to format the columns within the ‘Approval history’ sometimes it looks awful, especially if the comment is long.
Thanks
Craig
Hello Craig,
not really, it always has to fit in the width of the history columns. Maybe you could combine it with the approval history in a separate list as described here: https://tomriha.com/how-to-log-approval-history-in-a-sharepoint-list-with-power-automate/ – display some short summary directly in the item + link to the other list with the full information.
Hello,
Many thanks on this post, it really helped us.
The template works very fine for 3 line of approval but if we’re adding another line of approval it will not be seen in the SharePoint list/approvalhistory, the row remain fix only for the first 3 lines.
Any idea how to raise the raw height?
Hello Alexandru,
I don’t think you can increase the line height, if it’s more than the current height users will have to click on it to see more lines. Maybe you could reverse it to show the latest approval at the top as it might be more important than the first ones.
Hi,
Can you please tell me how you implemented that “Approval steps” variable in your flow ?
Hello,
The flow worked. Thank You.
But the approval history is not getting appended for me. Just getting replaced with the recent approval process.
One doubt here is I’m seeing Apply to each for “Approval steps”. I can understand that “Approval steps” is a variable but how it should be initialized and what should be the value?
It hasn’t been explained in the step-by-step process in this tutorial but shown in the order of the flow. So, getting confused about it.
As I have no idea about that step, I didn’t include that in my flow. I think because of that Approval history is not getting appended.
Kindly guide me with this ASAP.
Hello Dhivya S L,
if you need help ASAP I’d recommend hiring a consultant.
The ‘Approval steps’ variable contains the approvals, it can be e.g. a SharePoint list with approval configuration as described here: https://tomriha.com/build-approval-flow-for-various-number-of-approvers-in-power-automate/
Hi Tom!
Thank you for your posts they have been really helpful! Similar to Dhivya, I’m having trouble adding the “approval steps” variable. My team uses the “request automate” feature to request approvals. Is there a way to create the table history while still manually triggering the approval through the “request automate” feature? Where would that fit into the flow?
Any help would be much appreciated!
Hello Olivia,
I don’t know what do you mean by the “request automate” feature. This is a custom functionality that can be included in a flow that you’ll have to build, which can be a manually started flow and therefore it’s possible.
is it possible to update approver name in between a running workflow..?
is it possible to update approver name in to sharepoint document library while workflow is running status.
Hello Sheefer,
once the task is created, it keeps the approver. But if it’s reassigned by the approver it’ll be stored correctly in the approvals result.
How does this work with documents that are required to be checked out before they can be edited? In our SharePoint set up, writing to the item requires it to be checked out and the Power Automate flow fails…
Hello Jo,
you’ll have to try and see, I didn’t test it on files with this limitation.
Hello, I’ve created an HTML table for a different purpose (questions and answers from an MS Form) and tried to add it to a word tempalte using quick parts generated from the metadata of the custom content type I created. But in the sharepoint document library columns and in the word document, all I get is the HTML code, not a formatted table. I’ve used the enhanced rich text setting of the multiple lines of text column. Has something changed since this was first posted?
Hello Carla,
nothing changed with this solution, does your table have the right structure? Isn’t it missing some html tags?
Thanks for the solution but I’m getting the same issue like Carla.
I’m just getting displayed HTML tags in my column and not formatted table.
I’m using it against a document library and i can only set the column to use Multiple lines of text
Any suggestions would be appreciated
Hi Tom,
Thanks for this post.
I following your steps and in my approval history column, i just get a link that states “View Entries”. When i select the link, it just opens the item where I am able to see all the fields, including the Approval history field with the details.
Question, can the details of this approval history column be viewed directly from the list view rather than having to open the item?
Hello Jason,
I’d check the settings of the column, maybe you’re appending to existing values or something similar? By default it should show the approval history directly on the list as shown in the article.
I got this setup and it works great. I then added another separate approval process but the output has a paragraph set before the table. I have check the source and it shows:
I am baffled as to why two breaks are added – I cant find anything looking into the flow steps.
Here is what the source starts with:
”
“
It doesn’t let me cost to the code but after ” it has a ” ” ” ”
Great post! I’m 4-days in using Approvals. I’m using it for our Process Change Request process. I can’t seem to get the comments to go into my list column. Since I’m using “all must approve”, I only need the comments from the employee that rejected the request. I currently have this setup in a SharePoint Update Item under the False branch of a condition to update a list that was created from Form responses earlier in the flow. The other columns I’m updating work fine, but no comments are ever saved. I’m using Responses Comments in the Dynamic Content of Start and Wait for Approval, is “Responses Comments” the correct one I should be using?
n olonger works