“I created my own permission level in SharePoint ‘Contribute without Delete’, how can I assign these custom permissions to users in a Power Automate flow?”
The most direct Power Automate action to assign SharePoint permissions is the ‘Grant access to an item or a folder’. You select the site, list/library, item/file, user, and the permission level, and flow will do the rest. But the roles in this action are very limited. You can add only two permission levels: ‘Can edit’ giving user the ‘Contribute’ permission level, or ‘Can view’ to assign ‘Read’ permissions.

But what about the other permission levels? Let it be the default ones, e.g. Full Control, or custom ones, e.g. Contribute without Delete? What custom value does the action expect in the Roles field?
You’ll need the permission level id
If you select one of the available roles and use the ‘Peek code’ functionality, you’ll see what’s happens behind the choice field. The action replaces the ‘Can edit’ or ‘Can view’ with a string in format:
role:<permission level id>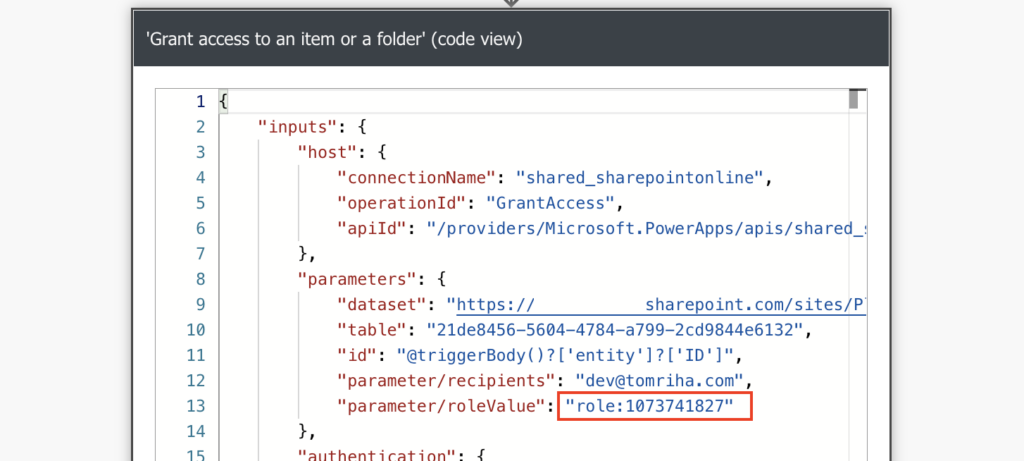
That’s what the action expects as a custom value. Therefore, if you want to add different permissions than ‘Contribute’ or ‘Read’, you can add them using the same string.
Get the permission level with an HTTP request
The permission level id is accessible only via an HTTP request to SharePoint. Add the ‘Send an HTTP request to SharePoint’ action with the configuration below.
Method: GET

Uri:
_api/web/roledefinitions/GetByName('<permission level name>')
Note: <…> is a placeholder, replace it including the < and >.
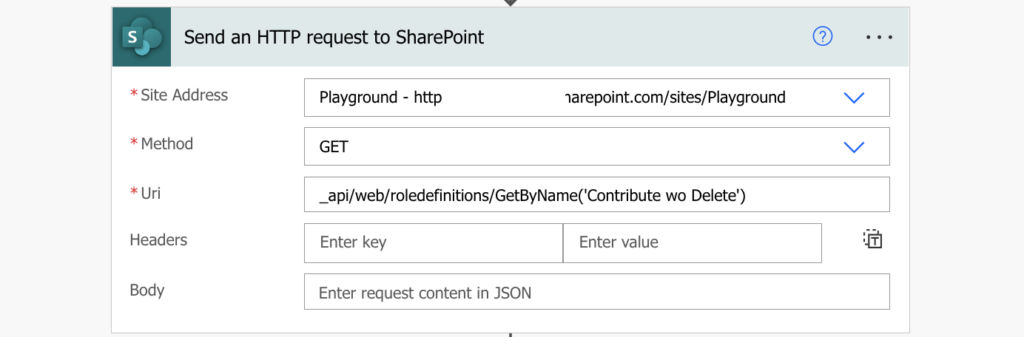
The request will check all permission levels on the site, and return only the one with the specified name. In this example it’s the ‘Contribute wo Delete’ permission level.
Extract the permission level id from the outputs JSON and use it to grant the permissions.
body('Send_an_HTTP_request_to_SharePoint')?['d']?['Id']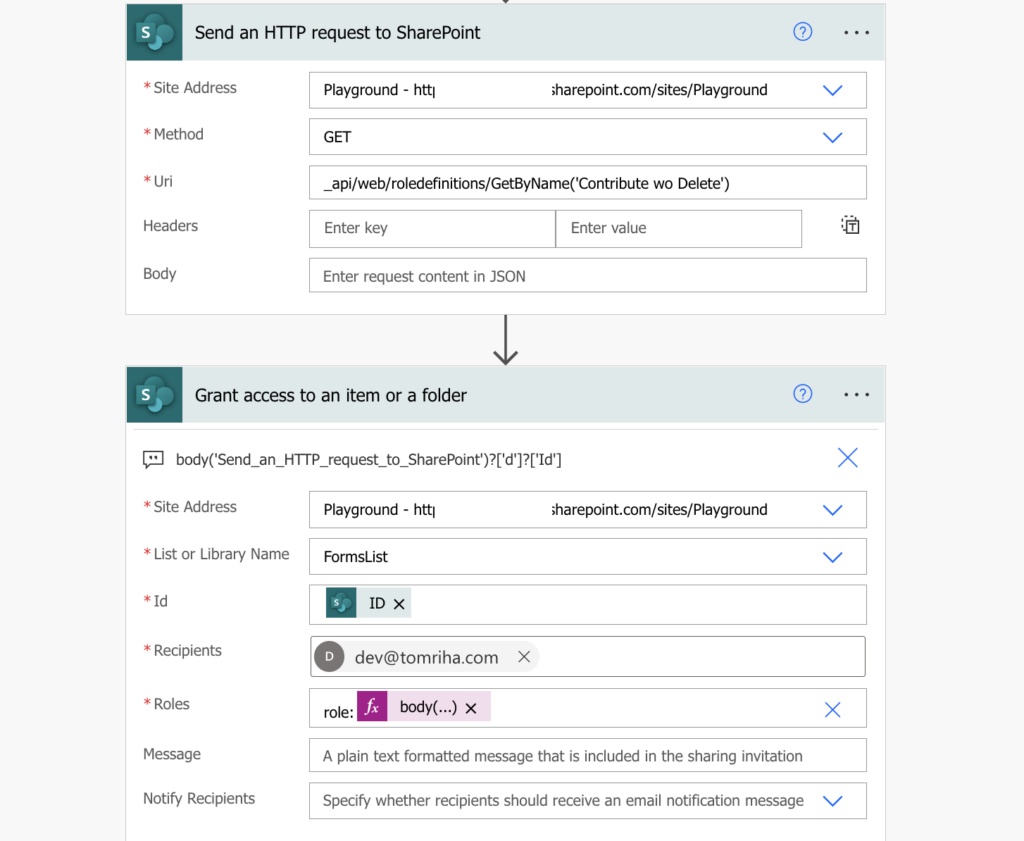
Summary
The new Power Automate actions expect that you’ll work only with two permission levels in SharePoint – ‘Read’ or ‘Contribute’, ignoring the the other default levels as well as the custom ones. But if you know the permission level id you can use it, let it be using the ‘Grant access…’ action or with an HTTP request.
Hi, would it be possible to delete the user permissions if the permission level matches? In the above case once i know the role ‘contribute wo delete’ , i would like to remove all those users from that level
Hello Naresh,
I don’t know, I never needed to remove only users with specific permission level so I have no idea if there’s an HTTP request that would list only those users.
Hi Tom,
The same action granting access to an item or folder works for other options than reading and editing. Please read this article from Microsoft. https://learn.microsoft.com/en-us/sharepoint/dev/business-apps/power-automate/guidance/manage-list-item-file-permissions
I really like your work and learned a lot, so I am sharing this with you.
Thank you,
Pratik
Hi Tom, you provide an awesome set of resources through your articles. If I see “Tom Riha” in search results when I’ve got a Power Automate problem, I follow that link first.
Do you know of a way to edit a specific permission level in a site? For example I want to remove “Manage Lists” from the “Edit” permission level in a Teams-connected SharePoint site that I am creating in Power Automate.
Thanks,
Tom