“I have a form where users can register for trainings, now I’d like to forward the Outlook events to them, can I do it with Power Automate?”
If you ever organised events, you probably noticed a pattern in some user’s behaviour – if it’s not in the calendar, it doesn’t exist. It’s not a problem when you invite users to a meeting directly, but what about optional events? For example a training session users can join upon registration? They visit a registration page, select the training with a date, and submit the registration. And forget about it.
Unless they receive an invitation into their calendars…
You’ll need the event id…
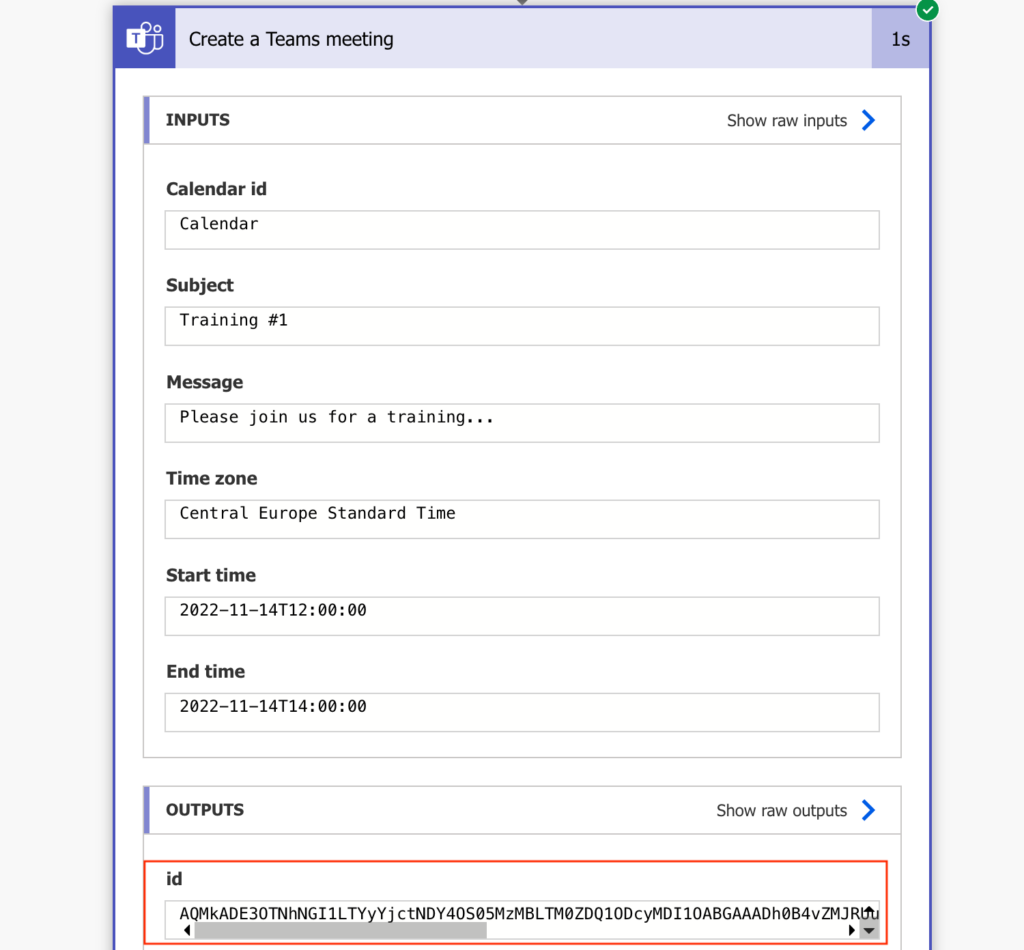
To forward an event you’ll always need the event id. You can get it using the ‘Get events’ action with some filters, but as some events can have the same name I prefer to take one more step back. Instead of creating the event manually build a flow that’ll create it for you. Such flow will give you the event id that you can store in a separate location, e.g. a SharePoint list.

… to forward the event (updated 01/2023)
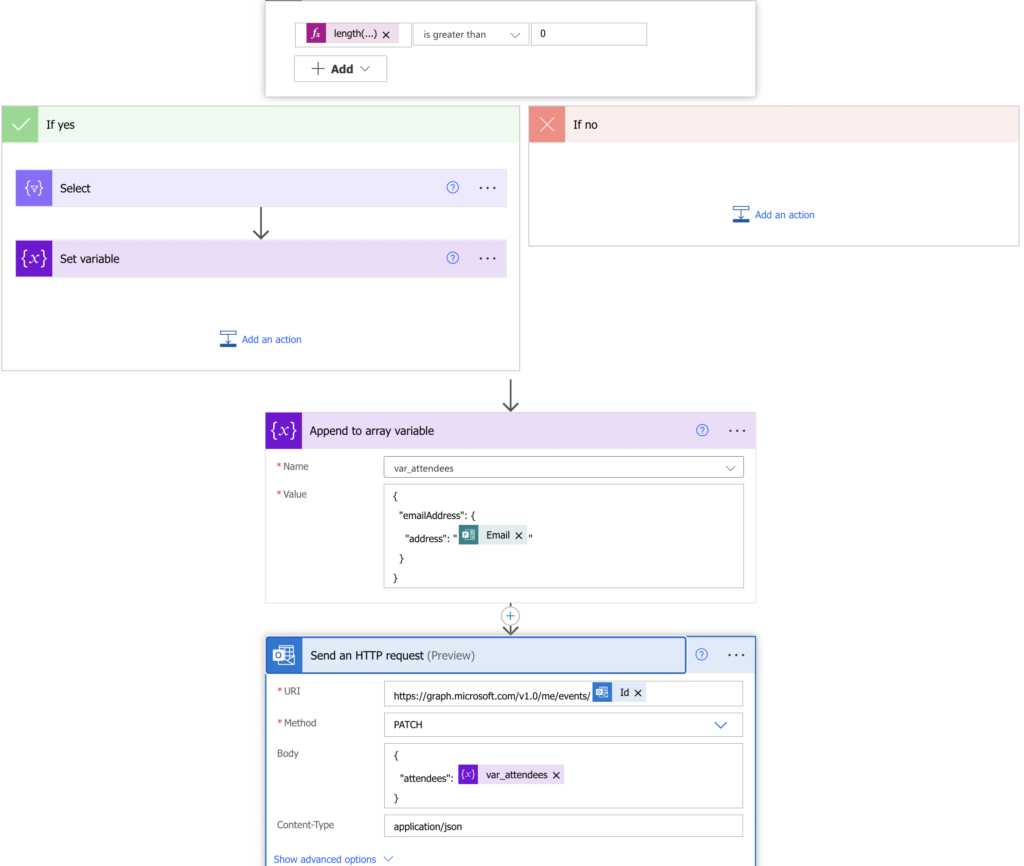
Since I encountered issues with the ‘Update event’ action where some users received multiple invitations, I had to look for another solution. And the solution is an HTTP request! Add the ‘Send an HTTP request’ action from the Office 365 Outlook and configure it as below.
Uri:
https://graph.microsoft.com/v1.0/me/events/<eventId>

Method:
PATCH

Body:
{
  "attendees": <arrayWithAttendees>
}
The <eventId> you already know, but the <arrayWithAttendees> is something you must prepare. Since you’re updating the event, you can’t enter just the new attendee. You must keep also the already invited users and extend the attendees by the new email address.
To do this, start by initialising an array variable, e.g. var_attendees.

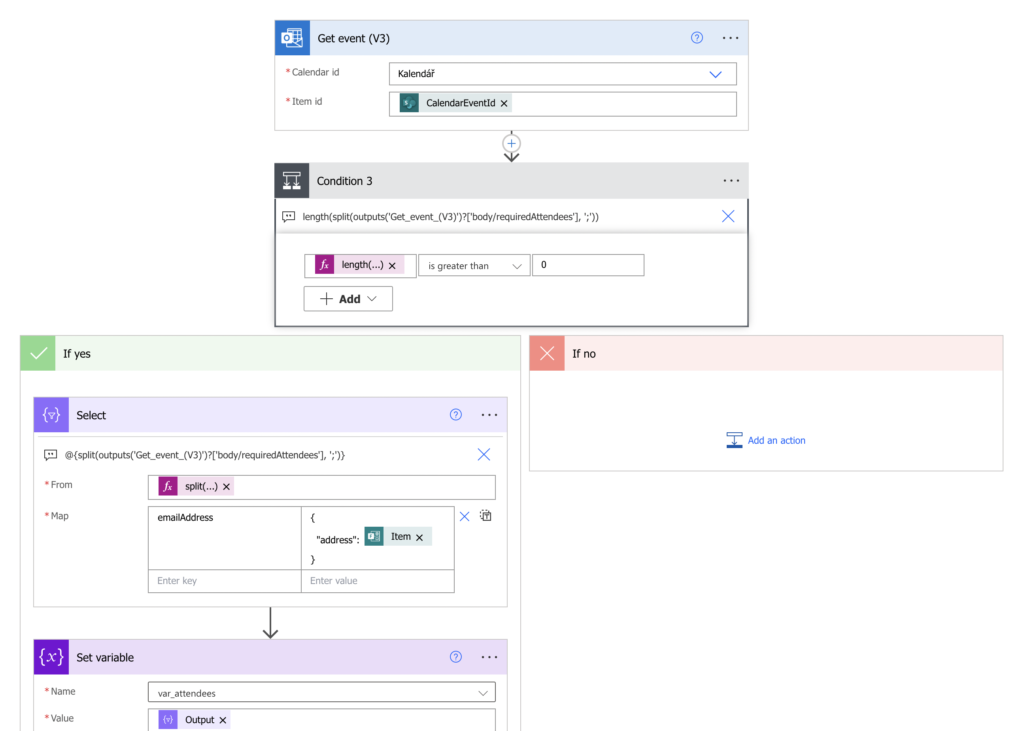
Get the event with the ‘Get event’ action and check whether there’re already any attendees. If there’re, use the ‘Select’ action to prepare an array in the required format.
[
  {
    "emailAddress": {
      "address": "<attendee1>"
    }
  },
  {
    "emailAddress": {
      "address": "<attendee2>"
    }
  },
  {
    "emailAddress": {
      "address": "<attendee3>"
    }
  }
]
Input all the attendees provided by the ‘Get event’ action, and split them by ; to split them into email addresses.
split(outputs('Get_event_(V3)')?['body/requiredAttendees'],';')Use them to create the emailAddress property.
{
  "address": @{item()}
}
Once you have the previous attendees prepared, you can append an object with the new approver into the array…
{
  "emailAddress": {
    "address": "<newAttendee>"
  }
}
…and extend the invitation with the HTTP request.

Original approach: can lead to multiple invitation emails!
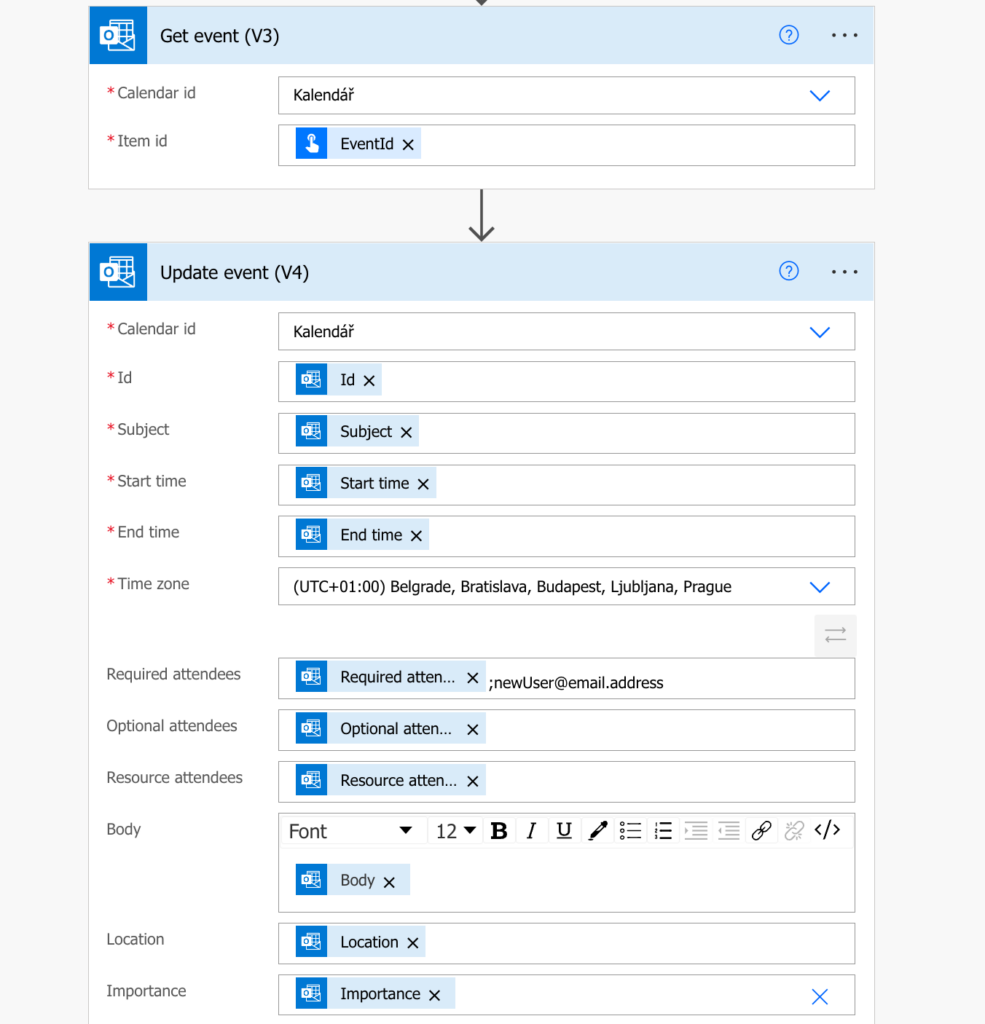
Once you have the event id, you can forward the event. There’s no action called ‘Forward an event’, but you don’t need it. Since the event was created in your calendar, you can use the ‘Update event’ action to update it. As long as you have the id…
Firstly, get the event with the ‘Get event’ action. This action is needed to get all the information about the event.

Secondly, add the ‘Update event’ action and use all the event information you got, otherwise some of it might be removed. Add the registered user email address to the ‘Required attendees’ and he’ll receive the invitation.

Important note: if you’re not in the UTC timezone you must convert the Start time and End time into your local timezone!
Summary
When you allow users to register for events, you should always forward them an invitation in their Outlook calendar, either manually or with a Power Automate flow. What you need for a flow is just the event id, once you have it you just keep updating the event with the new attendees as they come.
Thank you for the detailed article. It’s very helpful. However, I have an observation when I am trying to add an attendee to the event using above approach and if the meeting organizer is different then I see the attendees are not added. Am I missing something here. Can you provide some inputs here.
Hello Lokesh,
the solution is designed that it’ll forward only events created by the user whose connection is used in the flow.
Hi. I’ve followed the steps above but the select action with the @item part doesn’t add the email addresses but just adds “@item()” text where the email from the split should be. Therefore I get this error on the http request “ Property emailAddress in payload has a value that does not match schema.”
The emails do appear to be split properly as I’ve added the split expression into a compass and the outputs are emails addresses.
Got this to work in the end. It was because I needed to add “” around the item().
Hi, I am working on a similar flow where, when a participant registers I need an existing invite to be forwarded. However, I dont want other participants to be notified every time a new participant is added. Can I do that?
Hello Rajesh,
that’s what the HTTP solution does, it sends the invitation only to the new attendee.
Hi Tom
I’m trying to set this up but I have a question:
We are adding the email from the registration/form submission to the array or requiredAttendees.
So why are we adding the new attendee in the Update action? Aren’t we doubling up?
Also, does this re-send the invite to everybody each time somebody new signs up?
When we add someone manually, we can choose to only send to added attendees. Is that something we can do here as well?
Hello Christine,
it’s to keep the original attendees and not replacing them with the new attendee, the original ones don’t receive another notification.
Hi Tom
I’m trying to implement this but I’m hitting issues:
1) The Get Event action gives me an empty record which the HTTP action didn’t like. I’ve added a Filter array which seems to have resolved that.
From: split(outputs(‘Get_event_(V3)’)?[‘body/requiredAttendees’],’;’) and filter condition: @equals(empty(item()),false)
2) But I still get an error at the HTTP action (Property emailAddress in payload has a value that does not match schema.) and if I have a look, the old values have a backslash. How can I get rid of that?
{ “attendees”: [{“emailAddress”:”{\”address\”:\”old@s-hs.com\”}”},{“emailAddress”: “address”:”new@s-h.com”}}]}
Thanks,
Christine
Hello Christine,
for point 2 I’d use the json(…) expression that’ll remove the \ characters: https://tomriha.com/how-to-split-multiple-selection-forms-question-in-power-automate/
Hi Tom,
I am also facing the same issue – a “Property emailAddress in payload has a value that does not match schema.” error at the HTTP action. Could you please advise how this can be resolved?
Hello Clara,
my guess would be that you’re not sending the list of email addresses in the expected format.