“Is there any way I could fill-in buckets and plans directly in an Excel sheet so I could use only one file to create Planner tasks in as many plans as I need with Power Automate?”
I already published a post on importing tasks from Excel to Planner with Power Automate, but the solution is importing all the tasks into the same place. Every row in the Excel table will be taken and imported into the predefined plan and bucket. But what if you don’t want all the tasks in the same plan/bucket? If you want to use a single Excel file with all the tasks for multiple plans and/or buckets? How can you tell Power Automate which plan and which bucket to use for each of the tasks?
Use the group/bucket/plan IDs
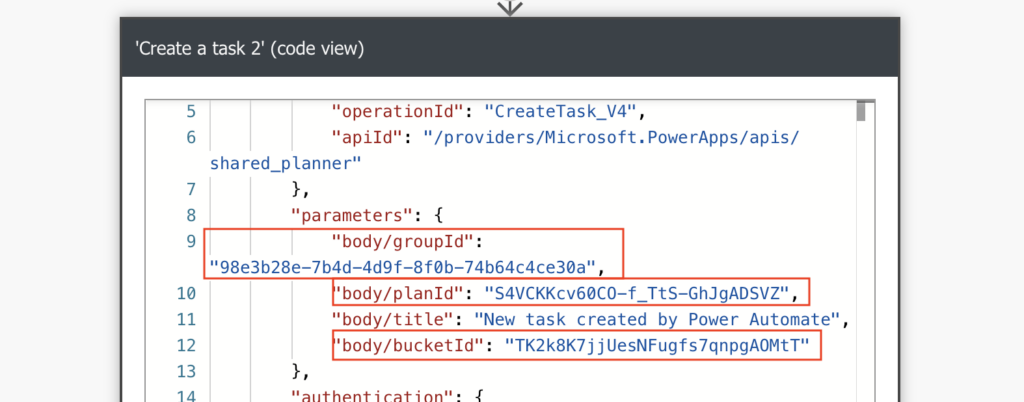
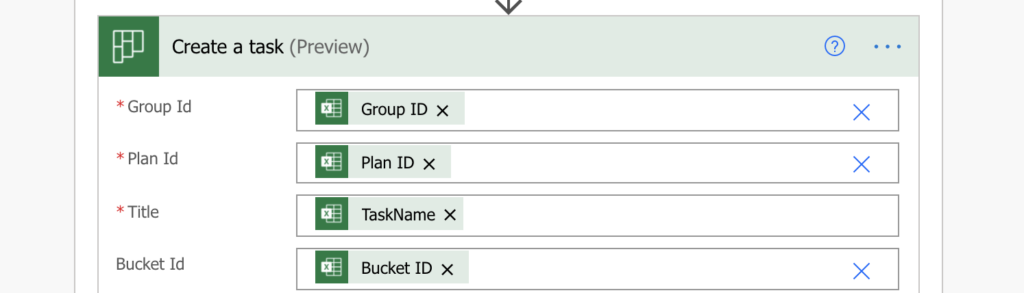
Power Automate works with the IDs of the Planner groups, plans and buckets, not with their names. You can see that if you configure the ‘Create a task’ action and then switch to ‘Peek code’. There’s a ‘groupId’ for the M365 group, ‘planId’ for the plan and ‘bucketId’ for the bucket. There isn’t any name except the task title.
To import tasks from an Excel file into various plans/groups/buckets you’ll need their ID.
Get the groupId and planId
The ‘groupId’ and ‘planId’ are easy to get from the url in the plan. Just open the plan in your browser and take it from there, ‘groupId’ is after ‘groupId=’ and ‘planId’ after ‘planId=’.
e.g.
https://tasks.office.com/tomriha.com/en-GB/Home/Planner/#/plantaskboard?groupId=98e3b28e-7b4d-4d9f-8f0b-74b64c4ce30a&planId=S4VCKKcv60CO-f_TtS-GhJgADSVZ

groupId=98e3b28e-7b4d-4d9f-8f0b-74b64c4ce30a
planId=S4VCKKcv60CO-f_TtS-GhJgADSVZ
Get the bucketId
It’s not so simple with ‘bucketId’ as that one doesn’t appear in the url. But you can use the Power Automate action ‘List buckets’ to get it as a workaround. If you add the action to your flow and run it, you’ll see in the run history all the available buckets and their information. Among it will be the bucket ‘name’ and the ‘bucketId’ (under the ‘id’ key).
e.g.
  {
    "@odata.etag": "W/\"JzEtQnVja2V0QEBAQEBAQEBAQEBAQEBARCc=\"",
    "name": "Tomas test bucket",
    "planId": "S4VCKKcv60CO-f_TtS-GhJgADSVZ",
    "orderHint": "8585898336857685264",
    "id": "sxFeLAlZxUGegsdj_GR0FJgACqXe"
  }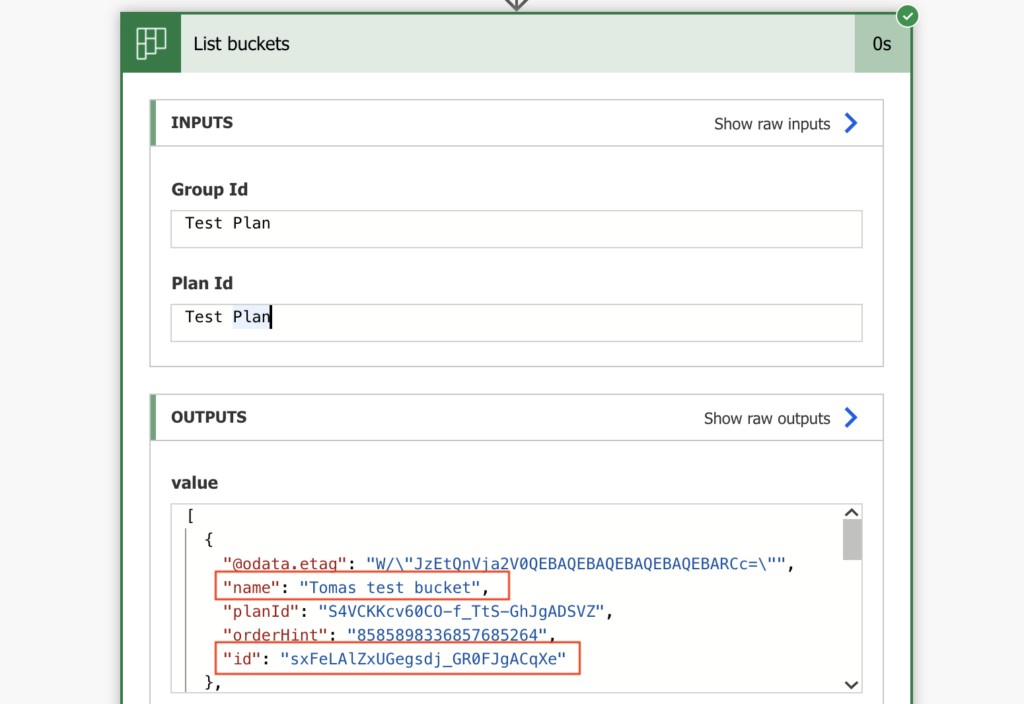
Find the right bucket by its name, take its ID and add it to your Excel import file.

Summary
The solution above describes how to use Power Automate to import Planner tasks from Excel into various groups, plans and buckets. It’s important to understand that Power Automate doesn’t work with names, it works with IDs. It’s because names can change, and a small change in the name could break your flow. But IDs stay the same from the moment you create the group, plan or bucket.
It’s also not necessary to store all the values in the import Excel sheet. If you’re creating tasks only in a single plan, you can preselect it in the action and store only the ‘bucketId’ in the sheet.
And it’s not limited only to Excel files, you can use the same solution also to import tasks from a SharePoint list. Just add the Ids to each of the items and it’ll work in the same way.
You can even follow up with a flow to send notifications for completed tasks in a specific bucket.
Thank you very much for this interesting topic!
Hi there,
is it possible to do this with responses from Microsoft Forms?
In a form I ask employees about the date and all other informations of an event they want to organize. And I want to assign every finished form to a task and to a bucket according to the date of the event. The event is in January, so the task should appear in the bucket “January”.
Hello Fabian,
yes, it is possible, I’d do it with a configuration list. Create all the buckets in advance, and search for their ID. Create a Configuration list, e.g. in SharePoint, with 2 columns: Name of the month and corresponding bucket ID. Then, in the flow, after you receive a new response, lookup to that configuration list, find the ID for the given month, and use it to create the task.
Hi,
In my Excel file I have a column showing the stages row item is at, “Qualification”, “Requirements”, “Design”, “Solution”, “Complete”. I have those same stages as Buckets in Planner. But I can’t seem to get the bulk import to place the row value into the correct bucket. My Excel file is freshly generated each day, so it’s not practical to convert the Bucket name to a GUId Bucket ID each day. How can I get PowerAutomate to work with the “friendly” Bucket names?
Hello Richard,
you can use the bucket names. List all the buckets and then use ‘Filter array’ action to filter the corresponding bucket Id using the bucket name every time before you create a task. The output from Filter array should be only 1 bucket with the name, and you can use it’s ID to create the task.
Can you import the tasks into multiple buckets at one time or does this have to be done bucket by bucket?
Hello Kelly,
the only way to import tasks is one by one, it doesn’t matter how many buckets you’re importing to.
This is so very smart, thanks so much for sharing this and the other how to articles
How can we add the due date for this scenario?
The ‘inputs.parameters’ of workflow operation ‘Create_a_task’ of type ‘OpenApiConnection’ is not valid. Error details: Input parameter ‘body/dueDateTime’ is required to be of type ‘String/date-time’. The runtime value ‘”45514″‘ to be converted doesn’t have the expected format ‘String/date-time’.