“Power Automate should determine by itself in which SharePoint list it will create an item, I want to use a dynamic content in the ‘Create item’ action.”
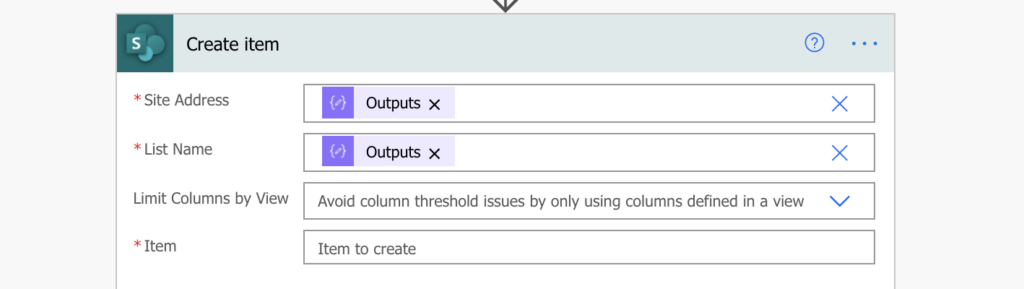
If you ever used the SharePoint ‘Create item’ action, you’ll know that you must select the ‘Site Address’ and ‘List Name’. It makes your work easier as when you select the list it’ll automatically show all available columns to update. But what if you can’t select the list? If you want to use a dynamic content: variable, data from MS Forms, or another item property? In such situations you can’t use ‘Create item’.
If you can’t select a list, the action won’t show you any columns to update, it’ll show only the field ‘Item’.
To create an item with a dynamic list/site, you’ll need an HTTP request.
HTTP request to create SP item
The action you’re looking for is ‘Send an HTTP request to SharePoint’. With ‘Create item’ you’re limited by the developers of the action, but it’s not the case here. Calling the SharePoint REST API through the HTTP request will give you full control over the item creation. You can use dynamic content for the ‘Site Address’ and/or the ‘List name’, and then manually define the column values.
The first part of the request is simple, you just replace the [ListName] with your dynamic content:
Method:
POST

Uri:
_api/web/lists/GetByTitle('<ListName>')/Items

Headers:
{
  "Accept": "application/json;odata=verbose",
  "Content-Type": "application/json;odata=verbose"
}
The second, more complicated part is the request ‘Body’. It must always start with the “__metadata” object, where the [ListName] dynamic content in the Uri and in the “__metadata” must be the same. That’s what defines the list structure and the available columns.
Once the “__metadata” object is defined, you can add the columns you want to update and their value. You don’t need to add all the columns, you can skip the ones that should stay empty. The example code below will create an item with 3 columns: Column1, Column2 and Column3.
{
  "__metadata": {
    "type": "SP.Data.<ListName>ListItem"
  },
  "Column1": "Value1",
  "Column2": "Value2",
  "Column3": "Value3"
}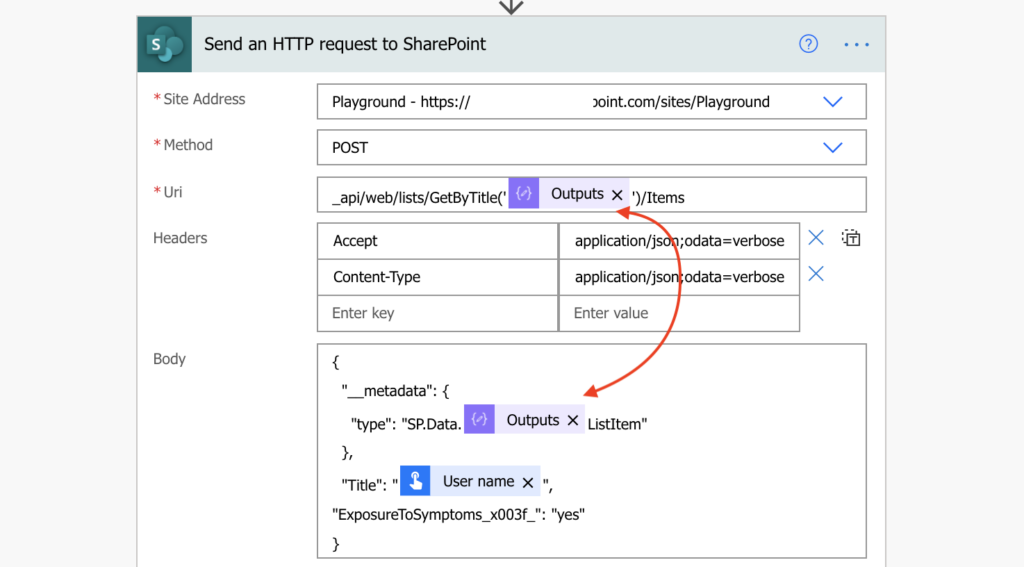
Note: there’re a few things to be careful about. Firstly, make sure that all the possible lists for the [ListName] contain all the columns defined in the ‘Body’. Secondly, you must use internal names for all the columns. And thirdly, some columns like the lookup or people picker have a special needs.
Summary
If you use Power Automate to create a SharePoint item in a dynamic list/site, you can’t use the default ‘Create item’ action. You must use the HTTP request described above instead.
And it’s not only if you want to split items among multiple lists, I use this solution also in flow ‘templates’. If there’s a flow I’d like to use on multiple SharePoint sites, I don’t want to reconfigure all ‘Create item’ actions for each site. I’ll store the ‘Site Address’ and ‘List Name’ in variables at the beginning, and then use HTTP requests. The one above to create items, and another one to update them.
I have been trying to make this work without success 🙁
Shouldn’t it be ListItemCreationInformation?
If this is the case, then I get the following error: “not valid JSON. A coma character was expected withing the objtect content.
Any help possible?
Hello Juan,
based on the error message I’d check if you have comma’s after the “Column1”: “Value1” pairs, except the last one.
Thanks for sharing this. This is a little addendum. If you want to get the list item from another list, use an HTTP get with “application/json;odata=nometadata”, and a $select={wantedfields}, then you can simply substring out the first bracket ((substring(string(outputs(‘get_list_item’)?[‘body’]), 1)) and add the preface metadata. This allows some pretty neat scenarios – e.g. dynamically copying a list item to multiple lists.
Or you can simply use the last field “Item” in “Create item” SharePoint action, and directly paste your object :
{
“Column1”: “Value1”,
“Column2”: “Value2”,
“Column3”: “Value3”
}
No HTTP needed.
Magic – this worked for me! Totally confused by ‘*Create Item ‘ field instead of the table columns being listed for dynamic specification of List Name. Maybe this aspect needs to be described as a solution with a worked example?
This keeps failing for me as it doesn’t recognise the List name, which is coming out correct in the dynamic content.
Any ideas?
Hello Kelly,
you can either try to find the correct list name, or use the list ID instead, as described in the new blog post: https://tomriha.com/use-the-correct-sharepoint-list-name-in-the-power-automate-http-request/
Thank you so much for sharing. This was very helpful for me. I’m finding an issue because my lists DisplayName doesn’t match the list WebAddress.
Name: TeamA
https:/mysharepoint/sites/mysite/lists/testinglist/allitems.aspx
Guess this is because I created it for testing and once ready, just renamed it to TeamA. I just didn’t know that the web adress will keep the original list name. I have a few lists with same issue.
So, when using power automate, I always refer to the display name list, but when trying to update an item via http, I get an error. How can I get within Poier Automate the web address of a list? Or much better, how can I rename the list web address to match the list display name?
Thank you so much in advance!
Sorry, I saw how to use the List ID instead. However, I couldn’t use your code for updating the item. I just needed to add X-HTTP-METHOD: MERGE to Headers and also replace the boy with just the column to be updated.
{
“MyColumn”:”MyData”
}
Thank you!
Wonderful post! Thank you so much
I’m struggling with a list name that has a space in the middle. I can get this to work on an identical list with a name that is a single word (such as XXXX). However, as soon as I put “%20” in the middle, it says “A type named ‘SP.Data.XXXX%20TrackerListItem’ could not be resolved by the model. When a model is available, each type name must resolve to a valid type.”
Got it! I left the space as an actual space in the URI field. However, in the Body field, I replaced the space with “_x0020_” instead of “%20”. Worked great!
https://learn.microsoft.com/en-us/power-bi/collaborate-share/service-url-filters#special-characters-in-url-filters
Hello Chad,
good job solving the problem, and thank you for sharing the solution.