“How can I use Power Automate flow to create a SharePoint list item including the information to which users is the Planner task assigned?”
Exporting Planner task assigned users to Excel file was already covered, but what about a SharePoint list? The problem is still the same – the output of the ‘List tasks’ action. If it returned assigned user email addresses, you could easily update them to the SharePoint item. But it doesn’t. It’ll return user id with a bunch of useless information. If you want to export the tasks into a SharePoint list, you must turn the user id into email first, and only then create the item.
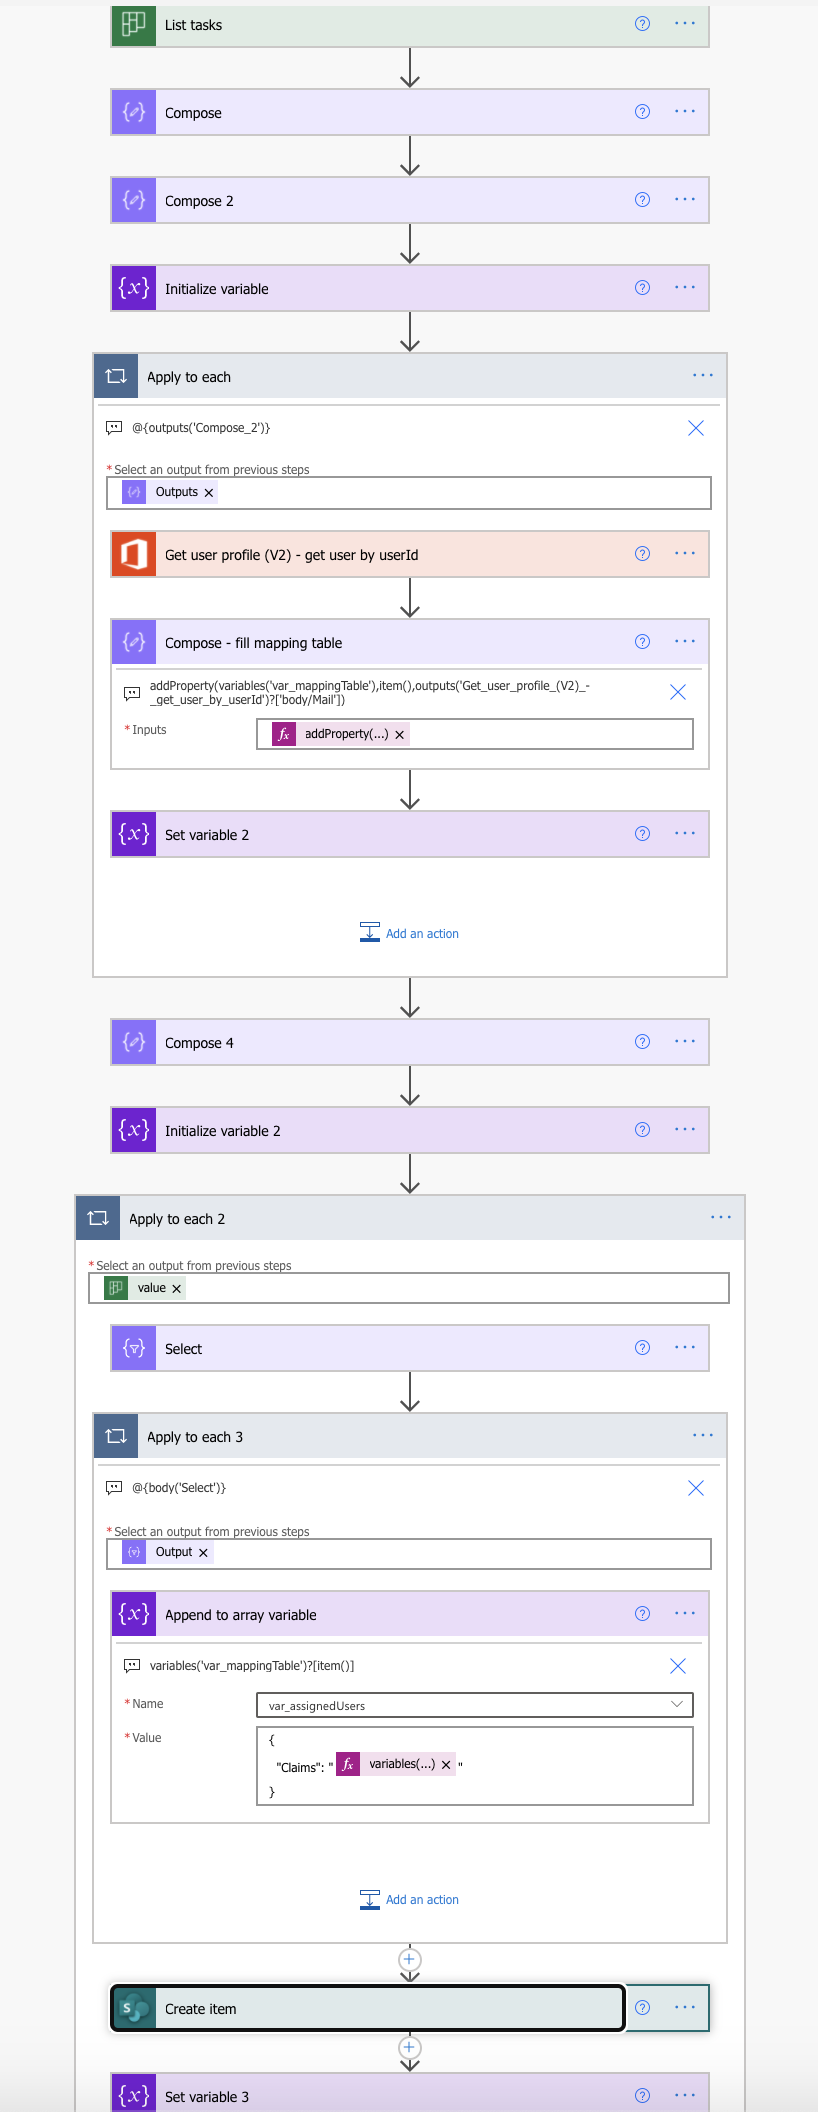
The basics of this solution were already described in other posts which I’ll reference.
Convert the user id into email address
As already mentioned, the first step is to turn the user id into email address. The approach is similar as when exporting users from Planner tasks to an Excel file. If you follow that post, you’ll get to the chapter “Fill the mapping table”. The original post is creating a mapping table with user names, but to update them in SharePoint item you’ll need user emails. To achieve that you want to store the Mail property, not the DisplayName in the variable.
addProperty(variables('var_mappingTable'),item(),outputs('Get_user_profile_(V2)_-_get_user_by_userId')?['body/Mail'])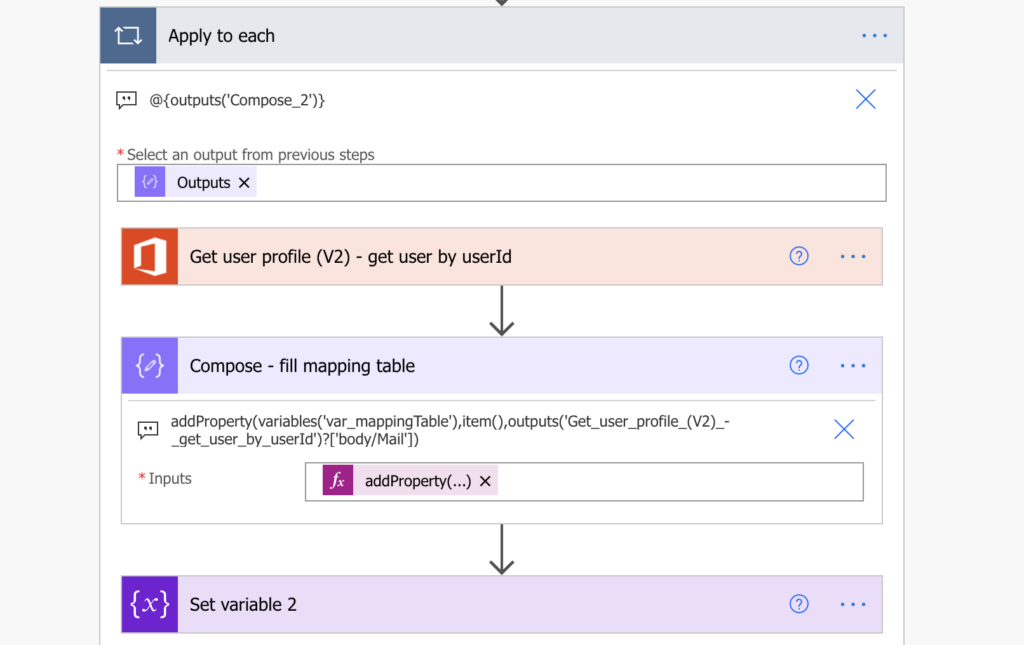
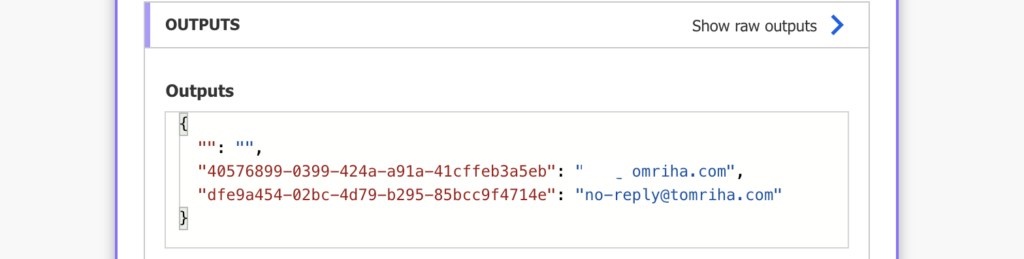
The mapping table will then have a format as below.
Use the mapping table
The second difference will be when updating / creating the SharePoint item. The goal of the Excel article was to create a readable string with user names. But to create a SharePoint item you must follow the desired format.
[
   { "Claims": "user1@company.com" },
   { "Claims": "user2@company.com" }
]
Therefore, when you store the user information in a variable, don’t save just the expression (user email). Append the whole key-value pair, including the brackets.
{ "Claims": "variables('var_mappingTable')?[item()]" }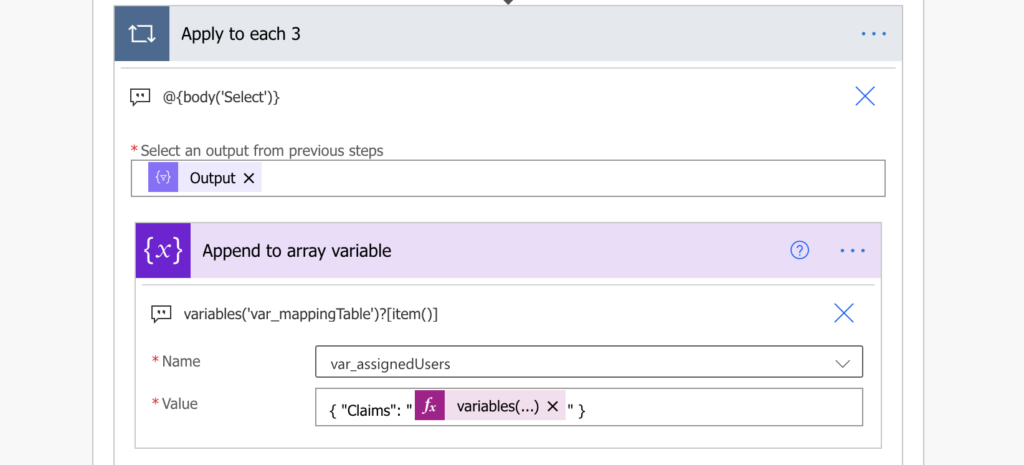
Then just switch to the ‘Input an array’ option and use the variable to store the assigned users to SharePoint.
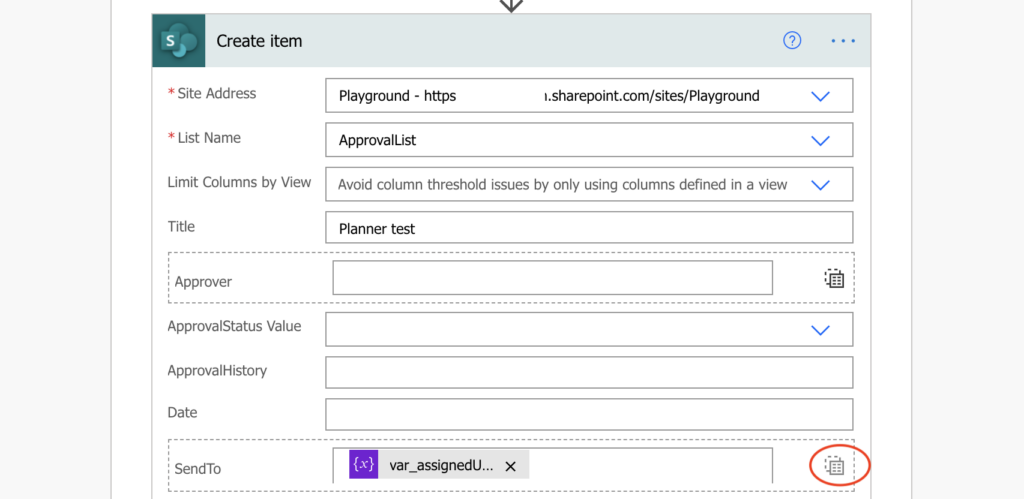
And don’t forget to empty the variable after each created item.
Full flow diagram
Only the actions that are different from the export to Excel flow are expanded.
Summary
When you export Planner tasks with Power Automate, the assigned users can cause a headache, and not only if you store them in a SharePoint list. You must take the user id, convert it to more useful user information, and then use it to export the task. But the good news is that the processing is very similar, no matter where you export the task. It can be an Excel file, it can be a SharePoint list, or just a simple email with HTML table.
Hi,
Thanks so much for your extensive work to help others.
I’ve tried the above but I’m getting the following error message:
Flow save failed with code ‘InvalidTemplate’ and message ‘The template validation failed: ‘The action(s) ‘Get_user_profile_(V2)_-_get_user_by_userId’ referenced by ‘inputs’ in action ‘Compose_-_fill_mapping_table’ are not defined in the template.’.’
Can you give me a steer?
I’m very inexperienced so it’s probably something obvious no doubt.
Thanks,
Garry
Hello Garry,
it’s because you ‘Get user profile’ actions is called differently than mine – mine was renamed to ‘Get user profile (V2) – get user by userid’. If yours has a different name you must adjust the expression it in the ‘Compose – fill mapping table’ action.
Hi,
I’ve managed to solve the above and got the flow to work. Now I’m just wondering what type of column the ‘SendTo’ needs to be in my list to make it work properly. If I select ‘Person’, I get an error message saying ‘The specified user could not be found’. If I do it as text, it copies in all of the ‘code’ (“Claims”:”{ etc).
Thanks,
Garry
Hello Garry,
the SendTo column is multiple people picker.
Hi Tom,
That’s great – worked perfectly with the correct column type!
Now, I’m trying to adapt this for the fact that, on my team, tasks aren’t always assigned to a person right away, so I want to create a daily flow that gets all Sharepoint List items with ‘Current Owner’ eq null, finds the corresponding Planner Task (planner task ID has previously been imported into the sharepoint list) and if there’s an assignee, updates the Sharepoint List ‘Current Owner’ field.
So far this means I’ve started with a Get Items (‘Current Owner’ eq null filter) =>For Each Item => Get a Task (Sharepoint list already contains the planner task ID from previous import). In your xpath code, I’ve substituted in ‘Get_a_task’, where ‘List_Tasks’ currently is, but it’s causing an error. As you can probably guess, I have no idea how to use JSON and this was a stab in the dark.
If I get could right code for this bit, I think the rest of the adaptations I’ve made might work. I’ve used the Select function on its own instead of inside a For Each Loop later on since it’s only a single planner item rather than a list – hoping the For Each Item loop at the start of the flow will take care of this function.
All the best,
Garry
Hello Garry,
the xpath(…) expects that the dynamic content will be an array, which is not if you reference only a single task. I didn’t test it but I’d try to add [ and ] around the dynamic content to give it an array format even if it’s just a single task.
xpath(xml(json(concat(‘{“body”:{“value”:[‘, body(‘Get_a_task’) , ‘]}}’))), ‘/body/value/_assignments/userId/text()’)
Hi Tom,
Thanks for this. The expression you’ve given me there comes up with an ‘expression is invalid’ error message. Appreciate you trying though!
Think I might have to give up on this one and just run a flow that puts the link to the sharepoint item in the notes on the planner task, with a note asking the user to click the link and manually update the sharepoint item when they assign an owner to the task.
Hi
I’m trying to create a flow that will update a sharepoint list with the assigned person in planner when the task is completed. I am trying to follow the instructions above, but i keep getting the following error: The execution of template action ‘Apply_to_each’ failed: the result of the evaluation of ‘foreach’ expression ‘@outputs(‘Compose_2′)’ is of type ‘String’. The result must be a valid array. The error occurs in the first apply to each, so I am assuming that i am doing something wrong with regards to either building the array, or joining the arrays.
I have the exact same inputs as you do in your first two composes. I am a little confused about the initialize variable, but i have the following in it: Name: var_mappingTable, Type: Array, Value: [
{ “Claims”: “user1@company.com” },
{ “Claims”: “user2@company.com” }
].
Is this correct?
Hello CC,
the error is telling you that the output of ‘Compose 2’ is not an array, not the variable. The ‘Compose 2’ should contain the union(…) expression whose output will always be an array so I’d double check the Compose and Compose 2 actions.