“I’m trying to list the user assigned to a Planner task, but all I can get from Power Automate is some complicated text without any names in it.”
[{“userId”:”40576899-0399-bb4a-a91a-41cffeb3a5eb”,”value”:{“@odata.type”:”#microsoft.graph.plannerAssignment”,”assignedDateTime”:”2021-07-25T13:44:51.1693428Z”,”orderHint”:”8585743862543238442PA”,”assignedBy”:{“user”:{“id”:”40576899-0399-424a-21az-41cffeb3a5eb”}}}}]
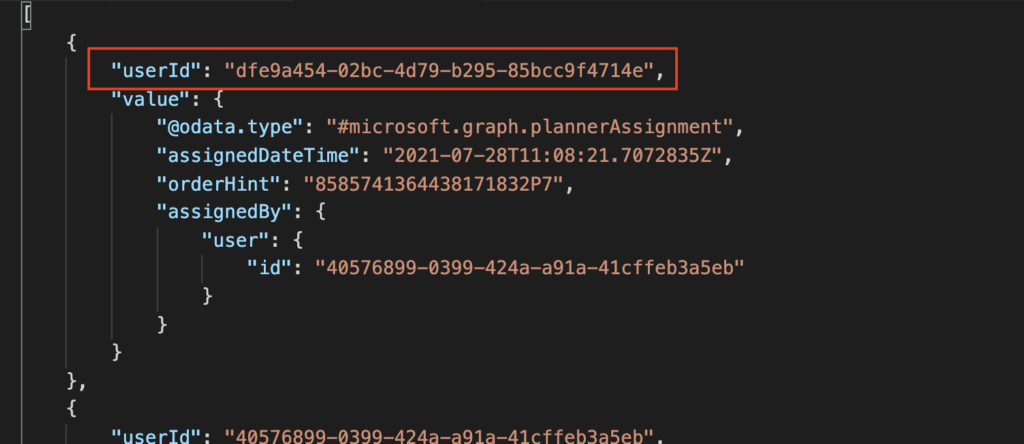
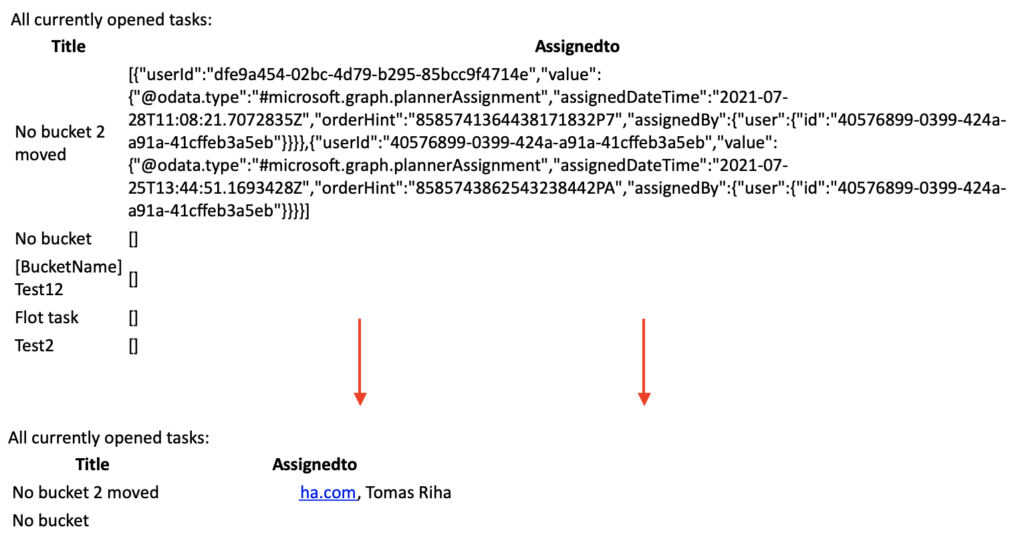
When you use the ‘assignments’ dynamic content from a Planner task, you’d expect a list of users. But it’s not that simple. You’ll receive a whole object that’ll contain much more information. There’ll be the ID of the assigned user, when the task was assigned to this user, who assigned it, and more. No display name, no email address, only the user IDs. If you want to know which user is responsible for the task, you must convert the user ID into user name. There’re two approaches, depending on how you want to process the tasks.
Process tasks one by one
In both cases, you must extract the ‘userId’ from the object. That’s the user responsible for the task, the information you probably want. You can use the ‘Select’ action in a similar way as when extracting user email addresses from user objects.

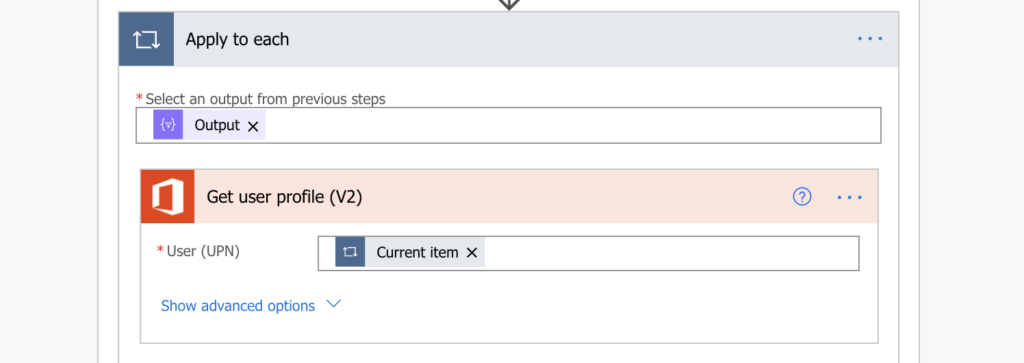
The output will be an array that’ll contain only the ‘userId’. Add an ‘Apply to each’, use the ‘Select’ output as the input, and ‘Get user profile’ for each of the ids. The output of ‘Get user profile’ will be all the available user information for each assignee – display name, email, etc. It gets a bit more complicated though if your tasks have multiple assignees.
Create a html table report with the tasks
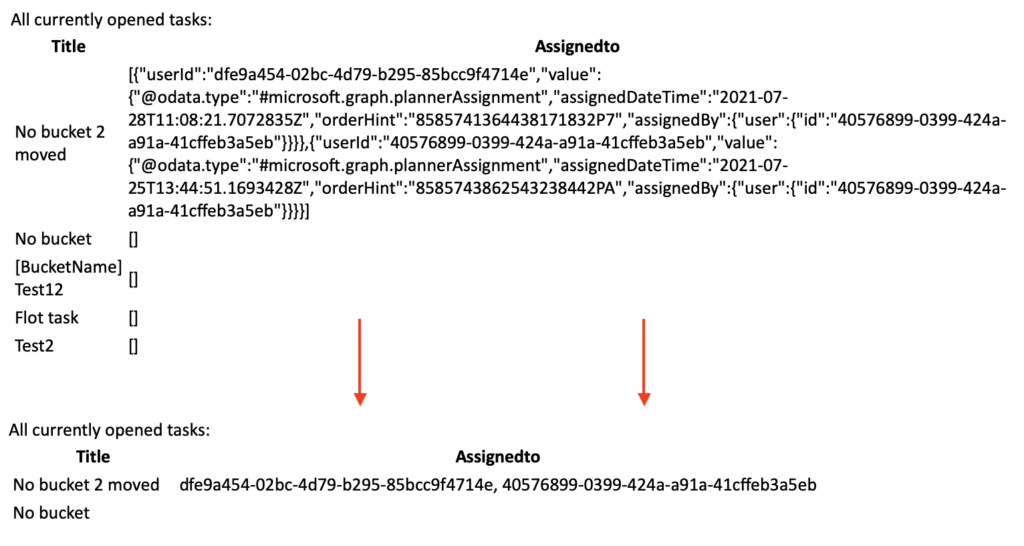
It gets a bit more complicated if you’re not processing the tasks one by one, but more tasks at once. For example, when you build a report of the Planner tasks. As already explained in the post on exporting SharePoint data, you can’t use any action for preprocess the data. At least not right away. It’ll take two steps to display user name instead of user id in the table.
Store only the userId in the html table
Similar to the first solution, you’re interested only in the ‘userId’. Only this time you can’t use ‘Select’, you must get it directly in the ‘Create HTML table’ with an expression. It’s a similar expression as when exporting multiple people picker into .csv table.
join(xpath(xml(json(concat('{"body":{"value":', item()?['_assignments'] , '}}'))), '/body/value/userId/text()'), ', ')
The table will look a bit better now, you reduced it from the full ‘assignments’ object only to the ‘userId’. But it’s not the desired result yet.
Get the unique userId’s
Now, when you’ve got the ‘userId’ in the table, you can convert them to a more understandable format, e.g. display name. But that means you must get the user information for each user with assigned task.
Using another lovely xpath(…) expression you’ll get all user ids from all the tasks, e.g. in a ‘Compose’ action.
xpath(xml(json(concat('{"body":{"value":', body('Filter_array_3') , '}}'))), '/body/value/_assignments/userId/text()')Note: body(‘Filter_array_3’) is the output of ‘Filter array 3’ action. If I wanted to process output from ‘List tasks’, it would be body(‘List_tasks’)?[‘value’]. It must always reference the output of the action where you list the tasks.
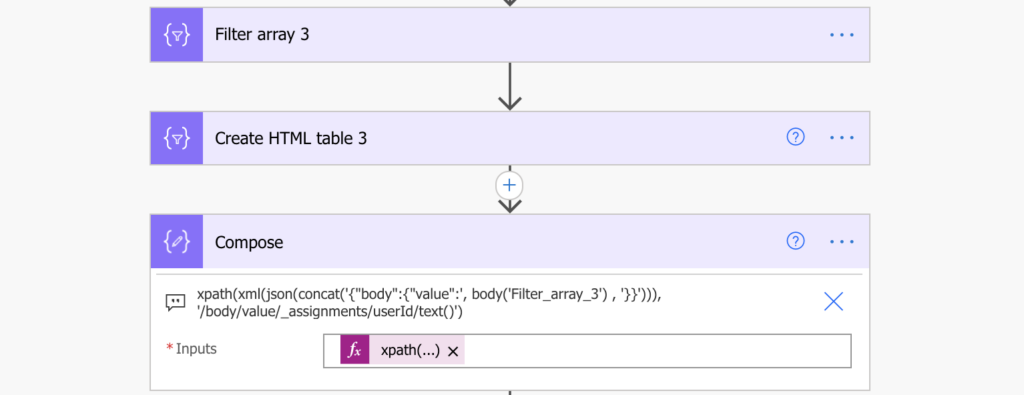
The output of this ‘Compose’ will contain the ‘userId’, but it’ll include duplicates. They must be removed with the union(…) expression as in the task importing post. Add another ‘Compose’ with the expression to remove them.
union(outputs('Compose'),outputs('Compose'))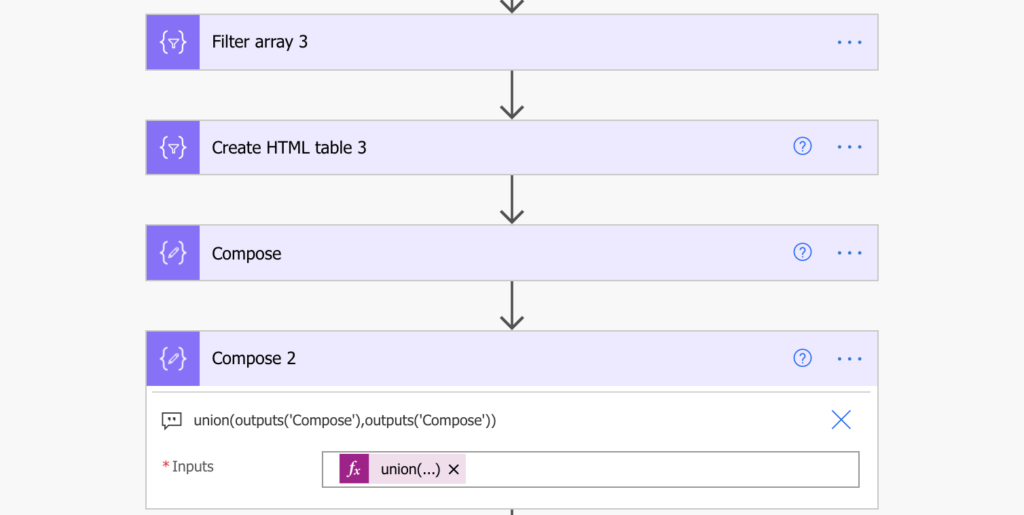
And with the unique ‘userId’ comes again time for the ‘Get user profile’ action. But before that, initialize a string variable to store the original html table. The next step will be to search for a user by its id and replace it in the html table. And since you can’t modify output of any action, you’ll need a variable.
Replace the userId with user name in the html table
Initialize the string variable and set it to the html table (output from ‘Create HTML table’ action) value. Add an ‘Apply to each’ to process all the unique ‘userId’ (output from the union(…) expression). Inside the ‘Apply to each’ place the ‘Get user profile’ action.
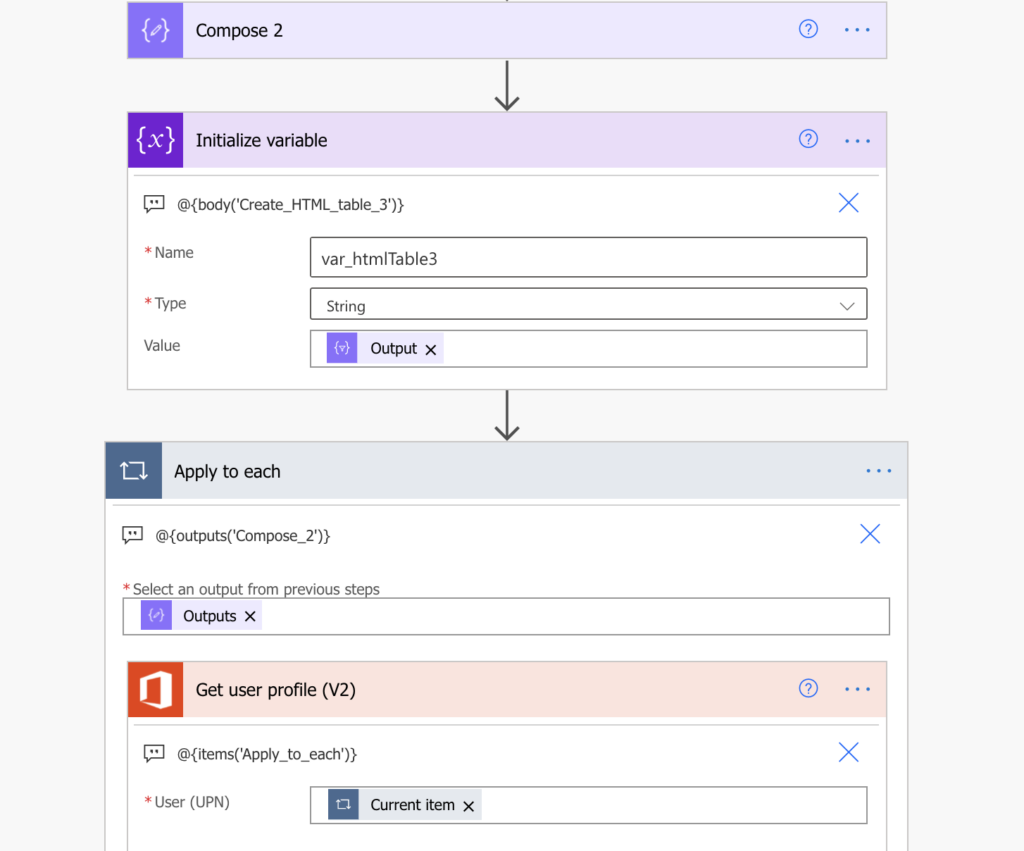
In each loop it’ll take the current userId, and search for the corresponding user. And since you know the id, and now also the name, you can replace it in the html table. Replace in the html table (stored in variable) the currently processed userId with Display Name.
replace(variables('var_htmlTable3'),item(),outputs('Get_user_profile_(V2)')?['body/displayName'])Note: again, make sure that you reference outputs from the right actions in the expression. You’ll also need another ‘Compose’ inside the loop as a middle step for the expression as you can’t self-reference a variable.
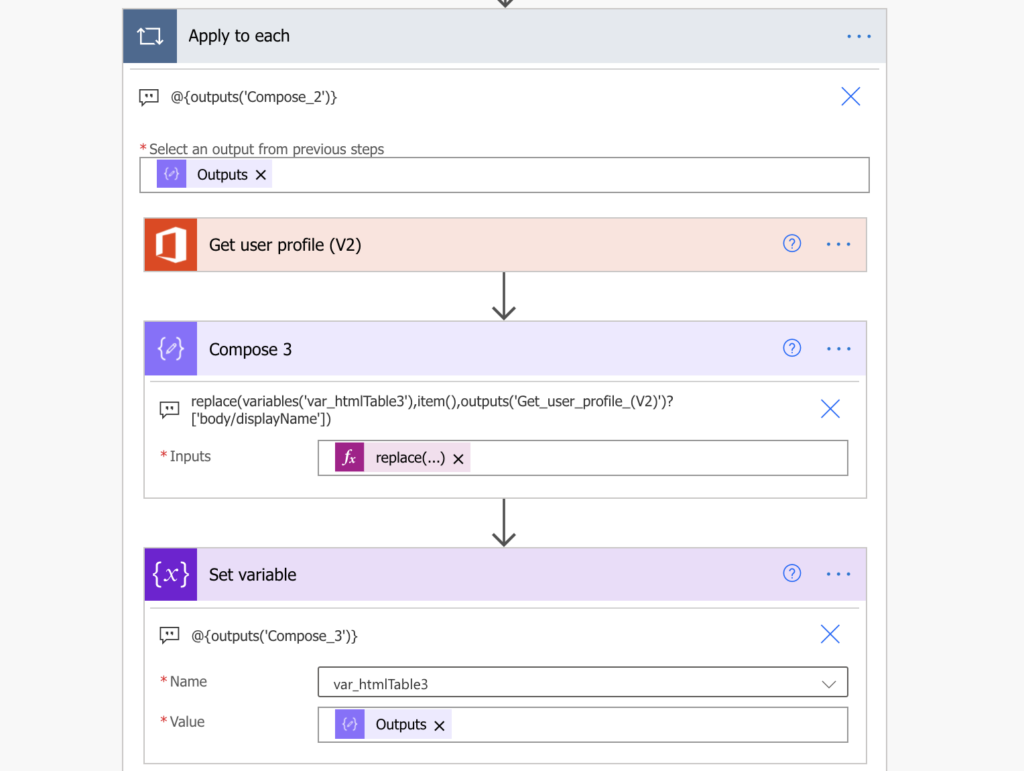
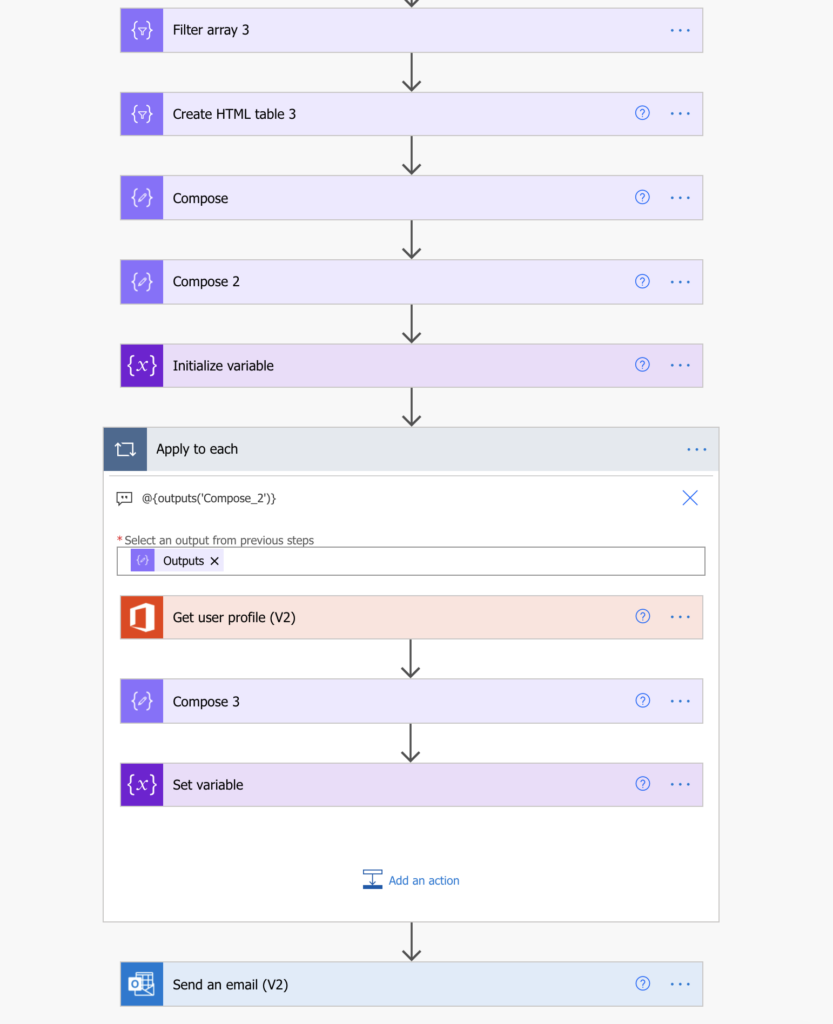
Once the loop completes, and all the ‘userId’ are replaced with the display name, you can use the table in the variable to send the email.
Summary
Looking at the solution above, I wish there was an easier way to get the name of the user with assigned Planner task in Power Automate. But since Planner will give you only the userId, you must work with what you’ve got.
The solution has at least two parts. First, you must extract only the userId. Depending on the use case, you can ‘Select’ one by one in a loop, or you can xpath(…) it. The second part is to convert the id’s into readable user names (or emails, or some other user property). And optionally third, if you’re building a report with html table, is to replace the id with the user.
I’m fairly certain this article describes the exact solution I am looking for. Unfortunately my coding skills are not up to following it enough to replicate in my own situation!
Despite my very rudimentary Power Automate skills and non-coding background, I have written a script which successfully creates a named Excel worksheet and a table within it and then populates it with data from tasks with a particular label from a Planner. I have pulled in the task name, description, due date (reformatted) and am now stuck on Assignees because there can be more than one and Planner doesn’t store a nice list of names in a string!
I will have to keep reading and try to understand the solution but at least you have pointed me in the right direction 🙂
Thank you
Hello Bruce,
I think that’s an interesting topic for another blog post.
Hi Tom, very nice blog and very usefull. Thanks a lot for sharing knowledge.
I tried all steps in order to get the users as desired form task, but as final results I keep obtaining the users ID in the encoded form. Any idea ?…I actually did the flow checker and there is no mistake in any variable or outout. My flow looks exactly as yours,of course I changed the Compose names for exemple adpating it to mine, but if not, it looks exactly the same.
Any hint why I do not have the names as desired ?
This is how it looks
Title Assignedto
test 2678ca4d-21c8-4d0a-977b-86608d9fcd32
Test 2678ca4d-21c8-4d0a-977b-86608d9fcd32
Test 1 090155c0-1572-4efc-8ef3-8c783c1980e2
Hello Leo,
it you still have the userId in the HTML table then there must be some problem in the replacement part. I’d check if I:
hi, great post! Can you advice me how to send a single mail daily to each assignee with assigned tasks? Tx
Hello Vit,
you can follow the steps in this article, the only difference will be in the source – instead of SP items it’ll be Planner tasks: https://tomriha.com/send-one-email-per-user-with-multiple-sharepoint-items-in-power-automate/