“I’d like to keep tracking of the time I spend on various tasks, is there maybe a way to build such solution using Power Automate flow?”
One of the goals for using Power Automate is to make your life easier. To remove repetitive tasks, or at least make them as easy as possible. Instead of doing a series of steps you can just start a flow and let it do all the work for you. One example could be the tracking of your work time. Instead of checking the time, typing it down, doing the work, checking the time again, typing it down again, and calculating the duration you can build a simple flow that’ll do it on a click of a button.
Prepare the data storage
Since you must store the information somewhere, the first step is to prepare the data storage. You can use an Excel file or a SharePoint list, but in both cases it’ll need at least 4 columns – start time, end time, duration, and description.
In this example we’ll use SharePoint list, rename the Title column to “Description” and add two Date and Time columns “Start” and “End”, and a number column “Duration”.

Build the start flow
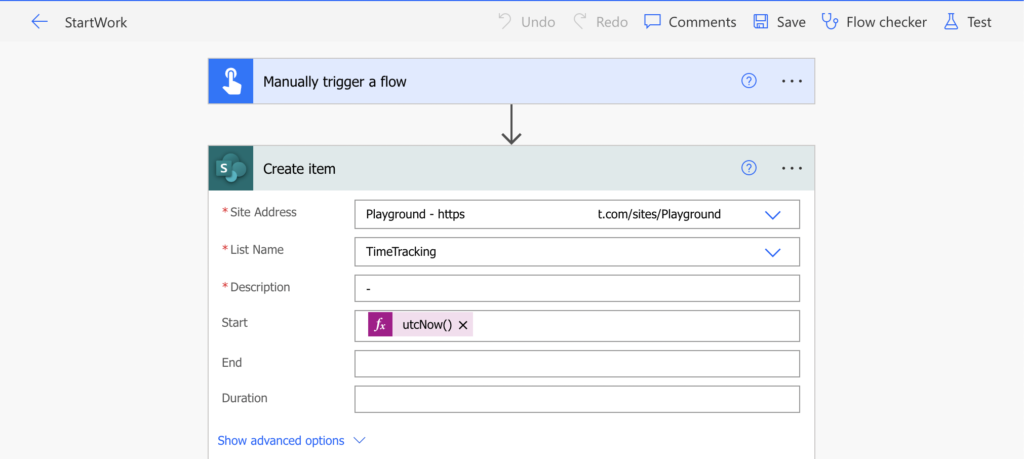
The starting flow is very straightforward as all you need is to create a new item in the list with the start date and time. Create it as a manually started flow with a single action ‘Create item’.

Build the end flow
The end flow is a bit more complicated as it must do a few more steps. It must find the last open item and update the end date. It must also calculate the task duration, the difference between the two dates/times, and the task description.
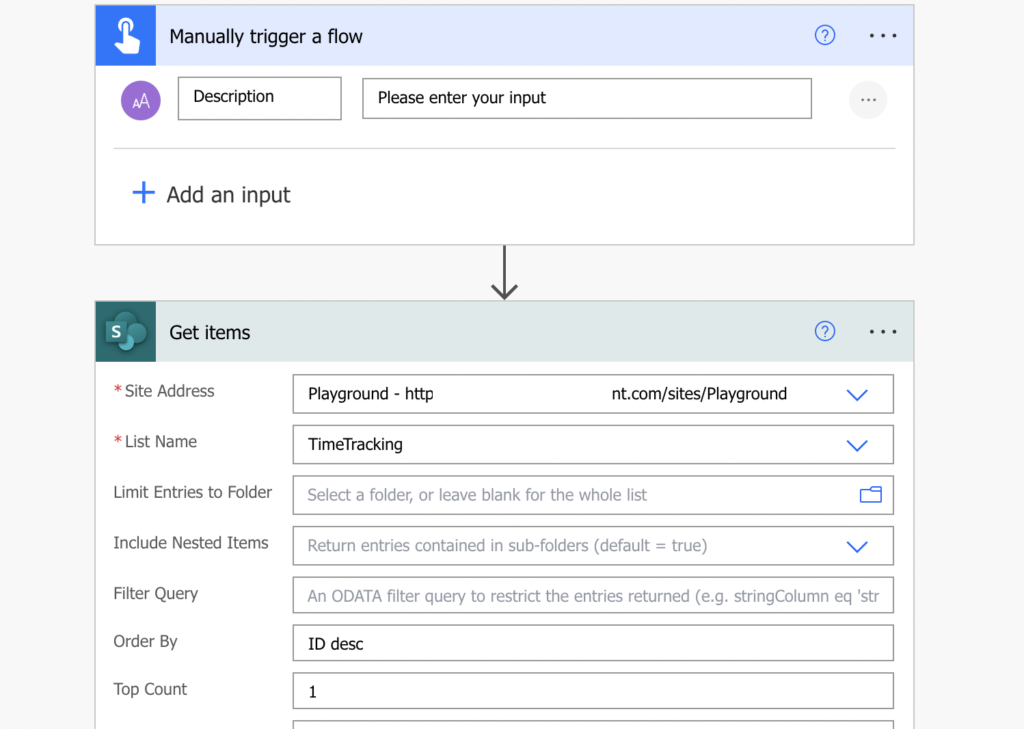
Start again from the manual trigger, but this time add a manual input “Description”.

Search for the last item using ‘Get items’ action with the Order By and Top Count fields.

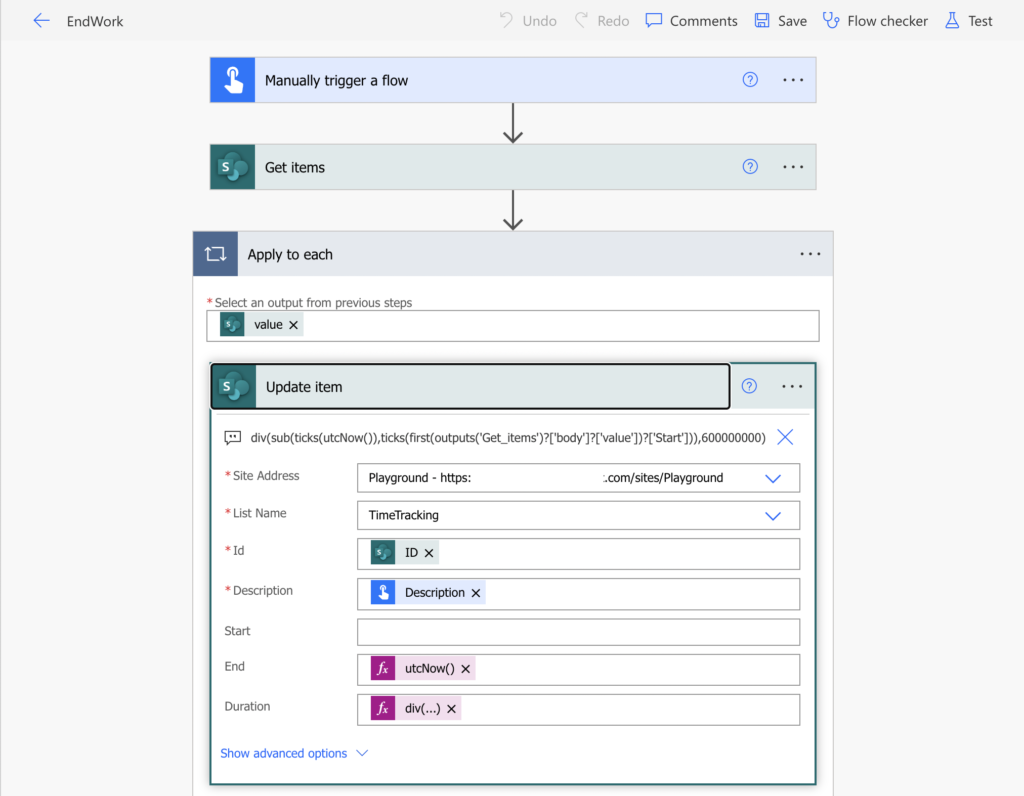
That’s the item to update, the one that contains the start time. Use it to calculate the difference between the start time and the end time – utcNow(). Minutes will be a good unit for the result.
div(sub(ticks(utcNow()),ticks(first(outputs('Get_items')?['body']?['value'])?['Start'])),600000000)Finish the flow by adding the ‘Update item’ action where you update the end time, duration, and the description you enter when you start the flow.

If you then follow the sequence “StartWork” and “EndWork” you’ll end up with an evidence of your work.

Summary
As you can see, you can use Power Automate to build even some applications, e.g. to keep tracking your time. Instead of doing some work you can just press a button, which is even better if you use the mobile application. Click one button to start tracking the time, click another one to stop it, get the duration, and log the work information.
I did the following to get this to work in Excel:
– Column A of the Excel sheet is titled “Index” and uses the formula =ROW()-1
– In the Excel sheet I have a spot for UTC at the start of a task, a spot for UTC at the end of the task. I then use an excel formula to calculate the length of time between those timestamps to get the duration.
I use 3 flows:
“New Task”
1: Manually triggers a flow gets the timestamp and description of task
2: Add a row into a table adds a new row with the UTC time for the start of a task and the description of the task
“End Task”
1: Manually trigger a flow gets the timestamp and description of task
2: List rows present in table
3: Update a row uses Index for Key Column and uses the formula last(body(‘List_rows_present_in_a_table’)?[‘value’])?[‘Index’] for Key Value. Then I enter the UTC time for the end of the task
“Change Task”
1: Manually trigger a flow gets the timestamp and description of task
2: List rows present in table
3: Update a row uses Index for Key Column and uses the formula last(body(‘List_rows_present_in_a_table’)?[‘value’])?[‘Index’] for Key Value. Then I enter the UTC time for the end of the task
4: Add a row into a table adds a new row with the description and UTC time for the start of the next task