“I’d like to organise the SharePoint navigation a bit, can I use Power Automate to create a sublink under a main link?”
When you use Power Automate to create new SharePoint lists, you want to make them easily accessible to the users. That often means adding them to the left side navigation. But in the original article it’s always creating the top level link. What if there’re too many lists making the navigation confusing? Or if there’re some related lists that would be nice to keep together? The solution might be creation of a sublink, and this article will show you how.
Get the main link Id first
Before you can create a sublink, you must first know where to place it, under which main link. Use the ‘Send an HTTP request to SharePoint’ action to list all existing links.
Method: GET

Uri:
_api/Web/Navigation/QuickLaunch
Such request will return a JSON with all the navigation links on the specific site. Extract the array with the results from the JSON and put it into ‘Filter array’. You don’t need all the links, you want only the one that should serve as the “parent” for your sublink, e.g. with a specific title.
From: body('Send_an_HTTP_request_to_SharePoint')?['d']?['results']

Filter: item()?['Title']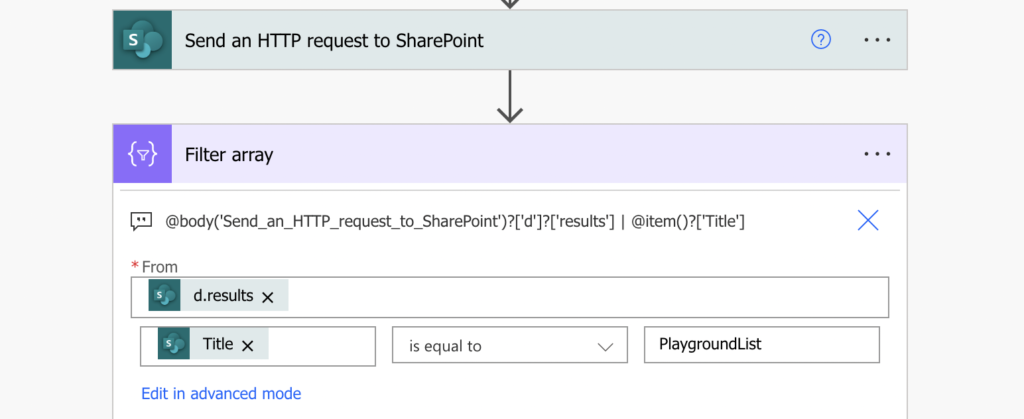
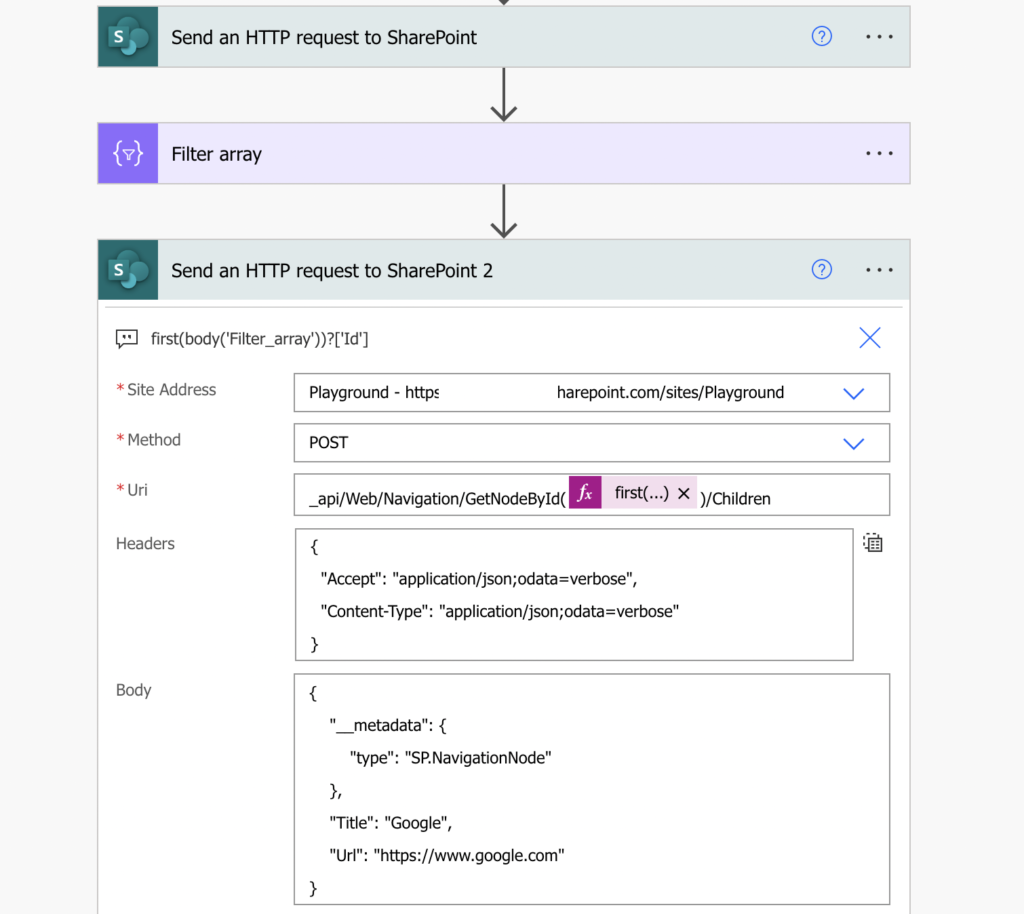
If the link name is unique (and it should be unique if you don’t want to confuse users), it’ll return exactly 1 result. Use the expression below to extract the navigation node id…
first(body('Filter_array'))?['Id']…to put it in another HTTP request to SharePoint. Now, when you have the main link id, you can add a sublink.
Method: POST

Uri:
_api/Web/Navigation/GetNodeById(<navigationNodeId>)/Children

Headers:
{
  "Accept": "application/json;odata=verbose",
  "Content-Type": "application/json;odata=verbose"
}

Body:
{
    "__metadata": {
        "type": "SP.NavigationNode"
    },
    "Title": "<linkTitle>",
    "Url": "<url>"
}
Note: <…> are placeholders, replace them including the < and >.
Summary
If you’d like to add a sublink to a SharePoint navigation using Power Automate, you must tell it where to place it first. Get the id of the parent link, and use it to create the new one. Just the two HTTP requests and a ‘Filter array’ as shown above and you’re done.
You have no idea how helpful this was – had a really hard time finding documentation on this.
Couple notes:
– if you’re having trouble with the endpoint, try /_api
– if you’d link to create a label link for purely organizational purposes, you can use ‘#’ for the url.
This was very helpful
If you want to go even further and add a sublink to a sublink:
Have all the steps the same but on the GET request have the uri as
_api/Web/Navigation/GetNodeById(2004)/Children
2004 is the ID I found for my level 2 Navigation link, this can be found by first running a small workflow with _api/Web/Navigation/QuickLaunch, then reading the Output of this request and looking for the ID of your desired level 2 link
Example
main link titles:
Home Departments
Level 2 links under departments:
Engineering Marketing
Level 3 links would be the ones we want to add under the specific Departments
So if you want to POST new links under the Marketing as sublinks, get the ID for Marketing (example ID: 2004) and use it on your flow as your first GET request:
_api/Web/Navigation/GetNodeById(2004)/Children
the rest of the flow should be the same
Note: Make sure the uri for the POST request is the same as the intructions in this article
The HTTP body adds one library to the Quick Launch but what should be use for multiple libraries?