“I receive an email with a .zip file in the attachment, can I extract its contents before Power Automate saves it into SharePoint?”
Power Automate is a great tool to help you organise email attachments. Every time you receive an email, it can check if it contains an attachment, and store it in a specific location. But for attached .zip files it’s not enough. You don’t want to just save the .zip file as you can hardly use it before you extract it. Just saving it will need a manual work to extract it – not the ideal situation. Why not let the flow do this work?
Extract the .zip file
Before you can extract the file, you must store it somewhere, e.g. in OneDrive or SharePoint. Just save it as you’d save any other attachment.
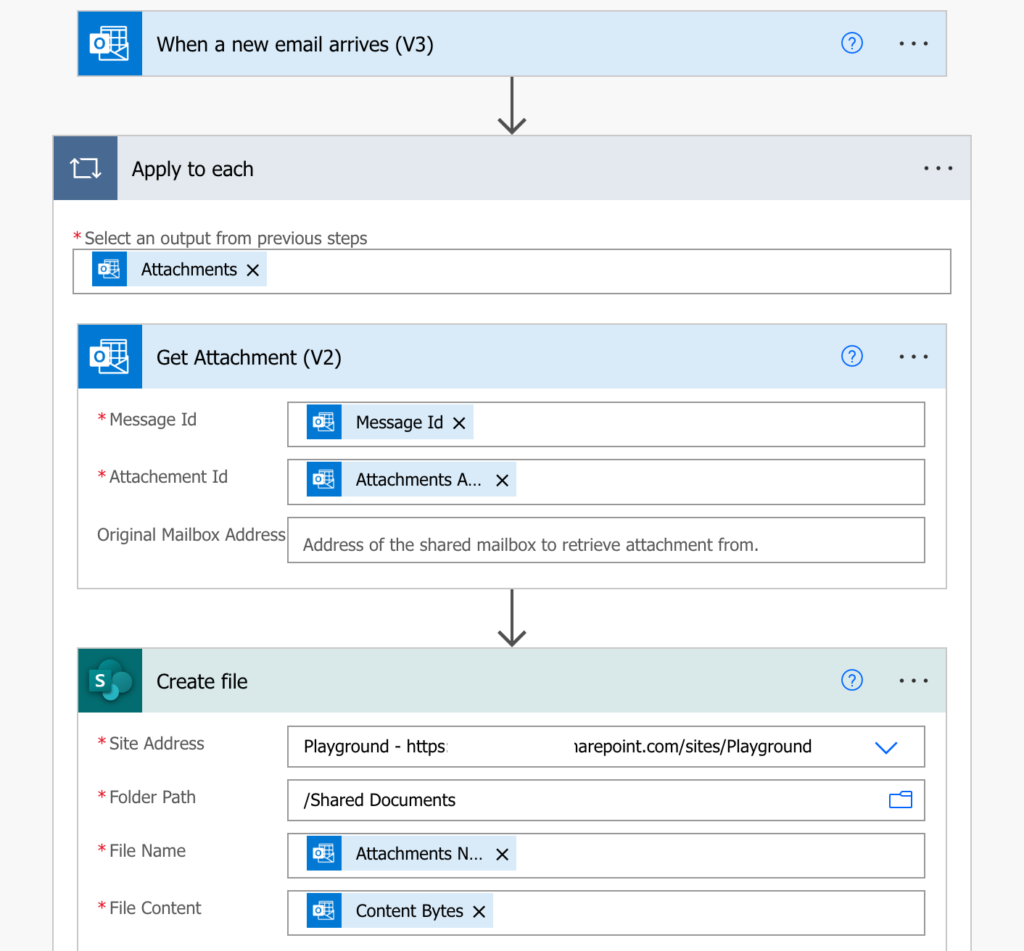
As there can be more than one attachments, check if the attachment ends with .zip in a ‘Condition’. If it does, extract it with the ‘Extract folder’ action.
It’ll ask you for the location of the file (which you know since you just created it), and a folder where it should extract the files. You can’t extract them directly into a SharePoint library, you must always create a new folder for the files, e.g. using the current date/time.
Important note: the action seems to have problem with : character in the time! I recommend using a custom format without the colon:
utcNow('yyyyMMdd-HHmmss')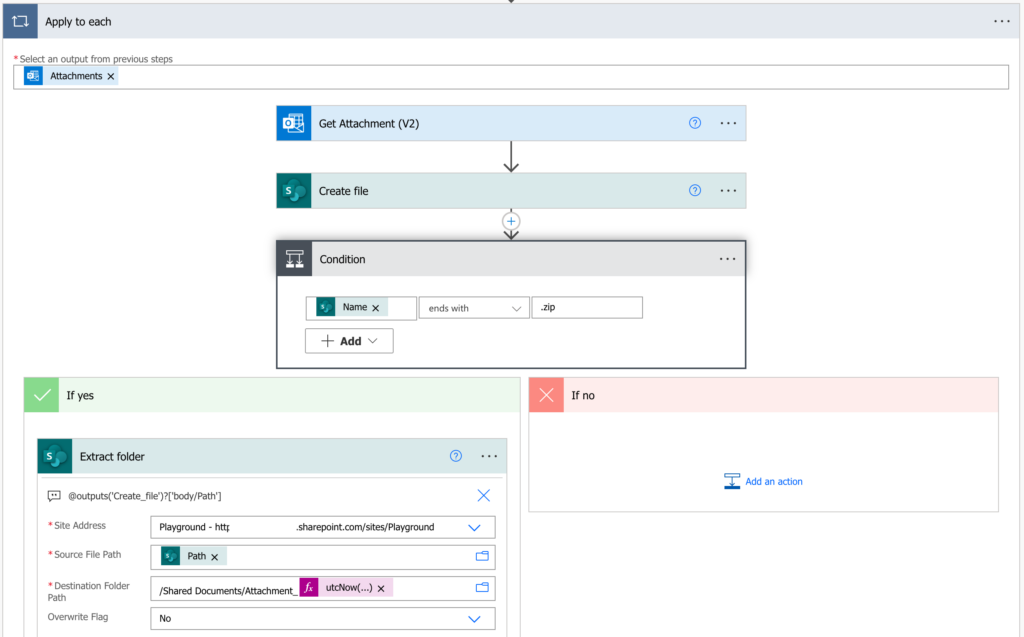
Move the files into a common folder
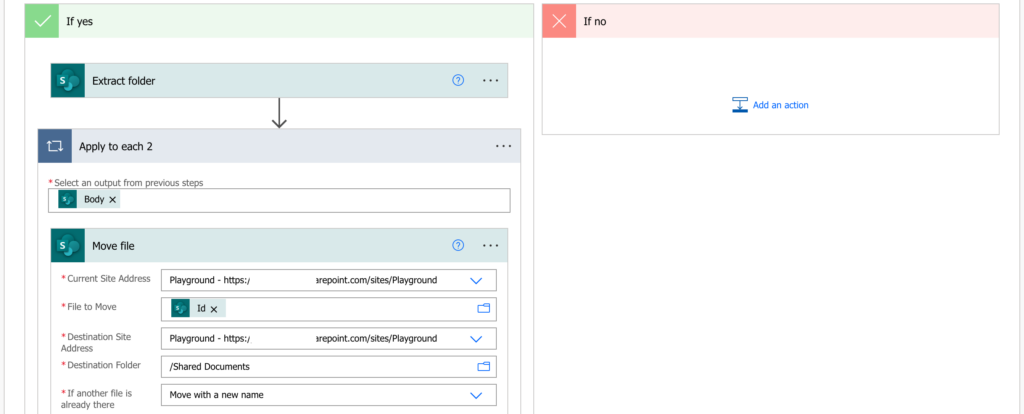
The files are now extracted, but in their own folder. That’s not a good place unless you plan using a wild folder structure. But since they’re now stored in SharePoint, you can move them anywhere you want.
Add the ‘Move file’ action and move the files using their Id in the final location. A fixed one, or a different location for each file.
Cleanup the .zip file and the folder
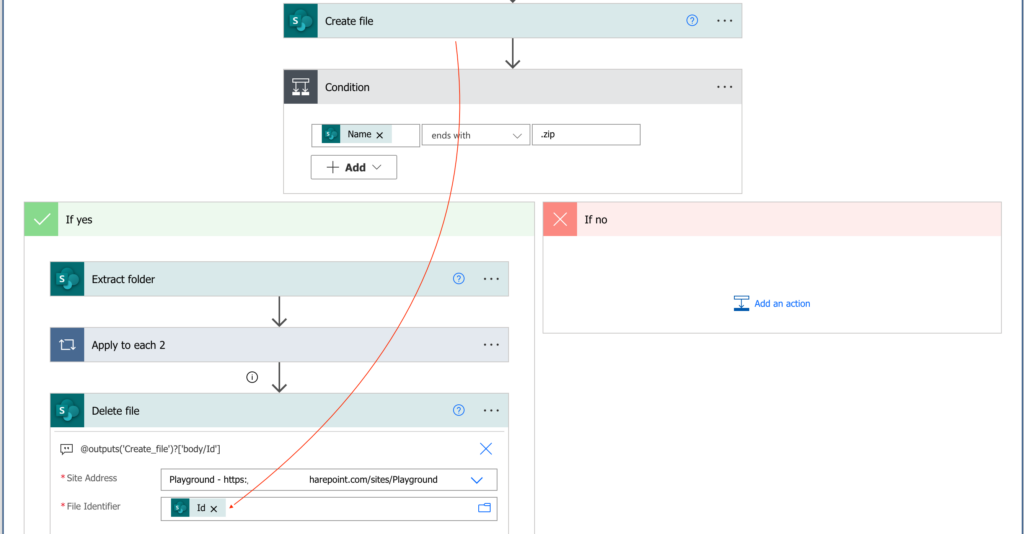
At this moment the flow created a lot of mess. You have the extracted files in the desired location (good!) but you’ve got also the .zip file and the empty folder (bad). Since you probably don’t want to keep all of it, you should do a cleanup.
Deleting the .zip file is the easier task – add the ‘Delete file’ action and delete it. You already have the file Id as you created the file a few steps before.
The much more complicated task is deletion of the folder. Since Power Automate doesn’t have a dedicated action to delete folders, you must use a “workaround”.
Firstly, you must get the Id of the folder as it’s not among the outputs of ‘Extract folder’.
Add an extra ‘Compose’ action to store the folder name before you extract the files. The reason is that the folder name is using the current date/time – it’d be different after the ‘Extract folder’ action.
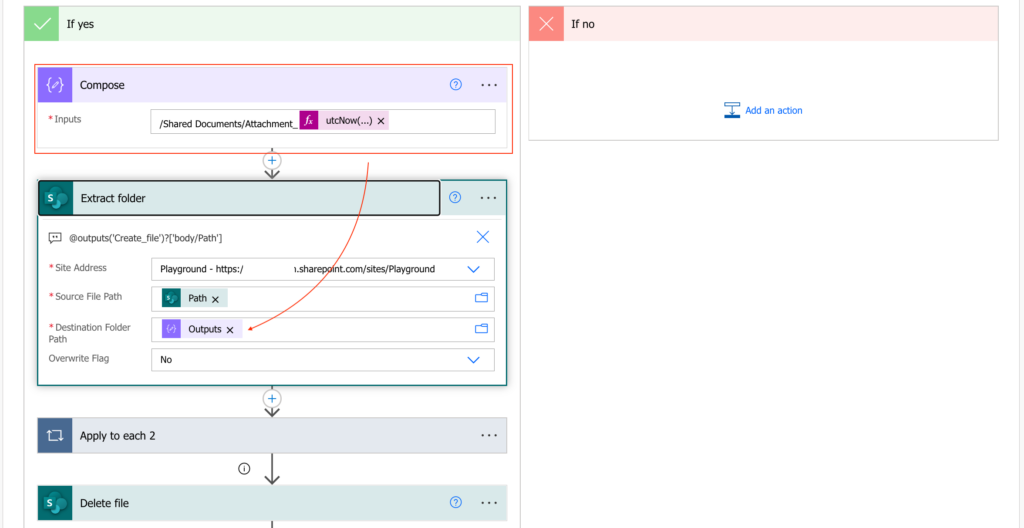
Once you know what folder name was used, add ‘Get files (properties only)’ with a Filter query on the folder path. You already moved all the files from the folder so it’ll return just 1 item – the folder itself.
substringof('@{outputs('Compose')}', FileRef)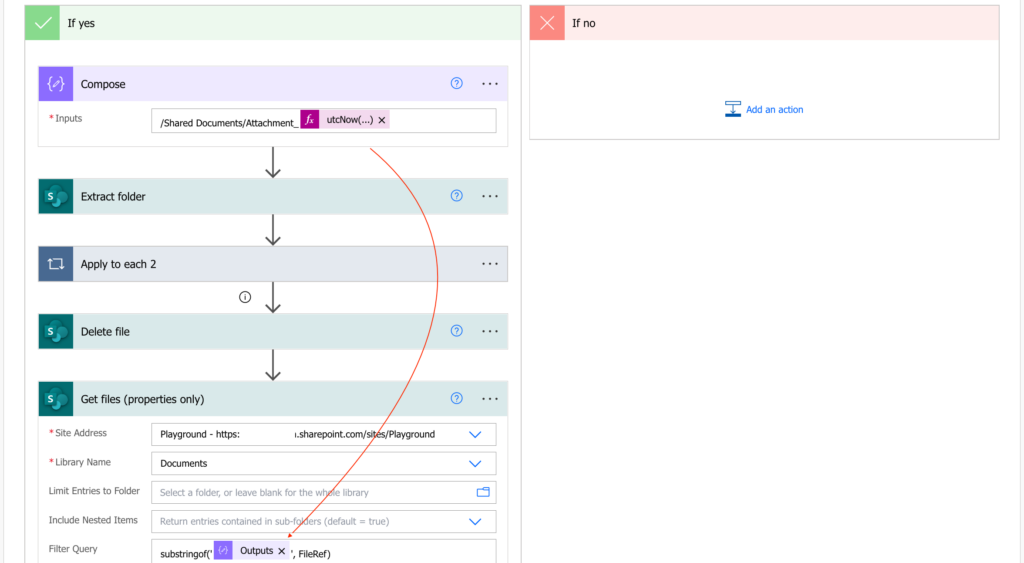
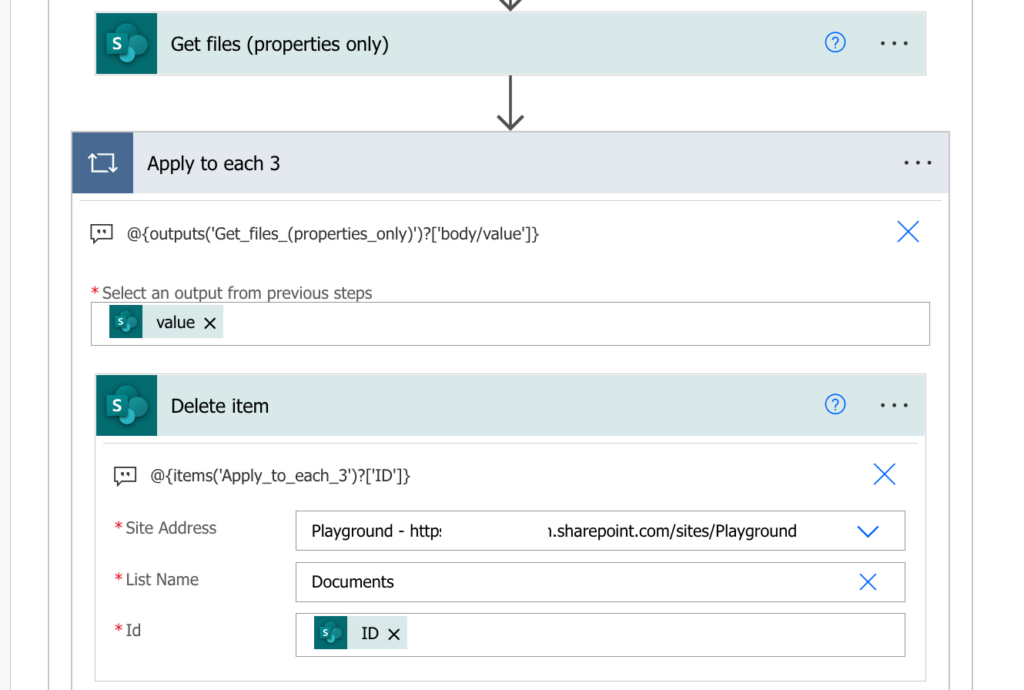
The folder itself can then be deleted using the ‘Delete item’ action. Enter the site URL, type in the library name (it won’t be in the dropdown), and use the returned Id to delete the folder.
The whole flow
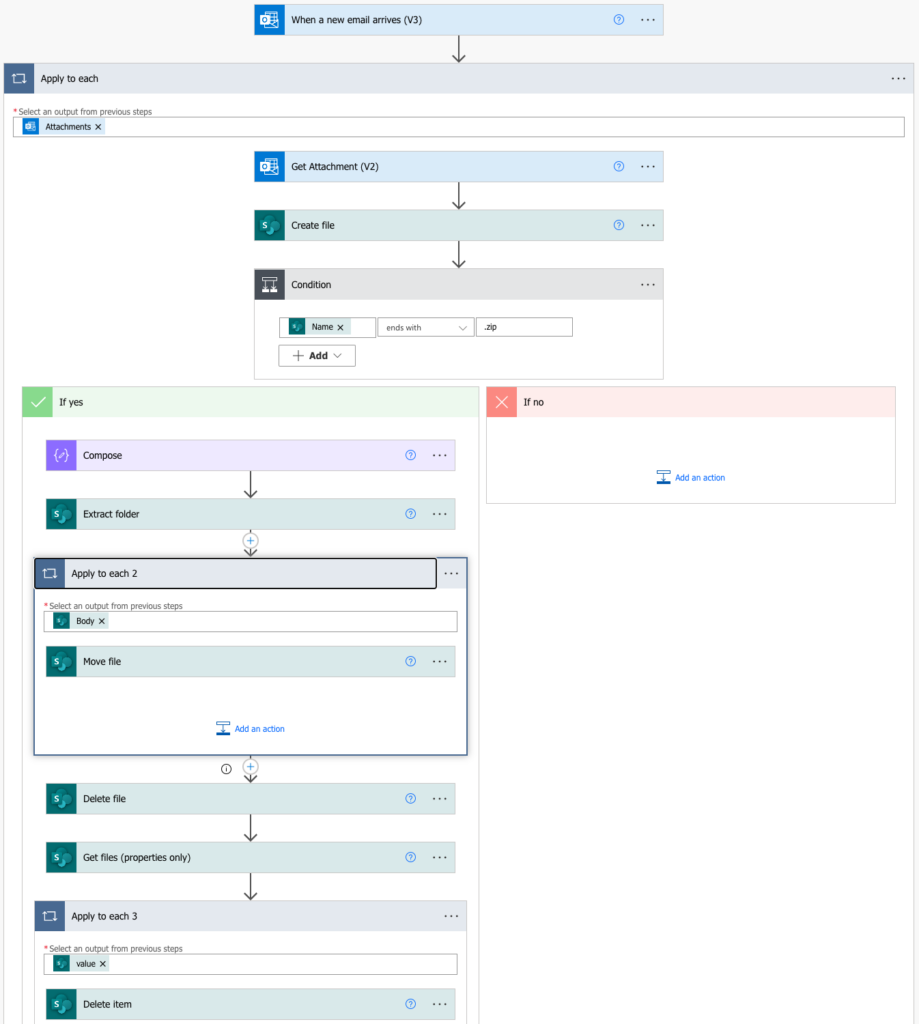
Summary
When you build a Power Automate flow, you should always think about the next step to automate – you just saved the email attachment, but what about the .zip files? If you just save them then somebody will have to extract them. Why don’t you automate also this “next step”? And when the flow extracts them, somebody has to do the cleanup – what about this step? And the next one, and the next one…?
The .zip file I receive is password protected, requiring a password before the file will expand the contents. Any tips on how to solve for that?
Any guidance would be great. Thank you.
Hello Noah,
not really, I never did this for password protected files.
I am struggling to get this to work for me. I seem to have the same scenario described here and I have been relatively successful except for the last step which is the workaround to delete the folder created in the Compose step. I have been successful in the Compose step, the Extract Folder, Apply to Each and Delete File. But when I do the Get files(properties only) with the Substringof on the Filter Query the output value is always null. I cannot seem to get the output I need for the final Delete Item step.
Hello Karen,
I’d check the filter in the flow run history, it’ll show you what folder path it tried to use. That way you can see if it’s the same as the actual folder path in the document library or if it differs (and you can adjust it accordingly).
Hi Karen,
I was having a similar issue with the last step, but I think I found a solution. After testing your flow, go to the raw inputs of the “Get file (properties only)” action and copy the table value. Then go to your “Delete item” action and paste the table value in the List Name. This seem to have fixed the issue for me.
Hope this helps!
Hi Tom, Can you please suggest what is the limitation of the file size for this action? Extract Folder.
I have some GB’s of data to extract, will that work?
Many Thanks
Hello Siddhartha,
I have no idea, you’ll have to try it on some of your big files and you’ll see.
Are you able to change the file name to something specific? For example “Finance Report 10.18.23”?
This was very helpful!
Hello Chelsea,
no, you can just extract the files. But you could extend the flow to search for the specific file, let it be by file name or the date when it was created (it’ll be right after the extraction) and you can rename it.